Overview
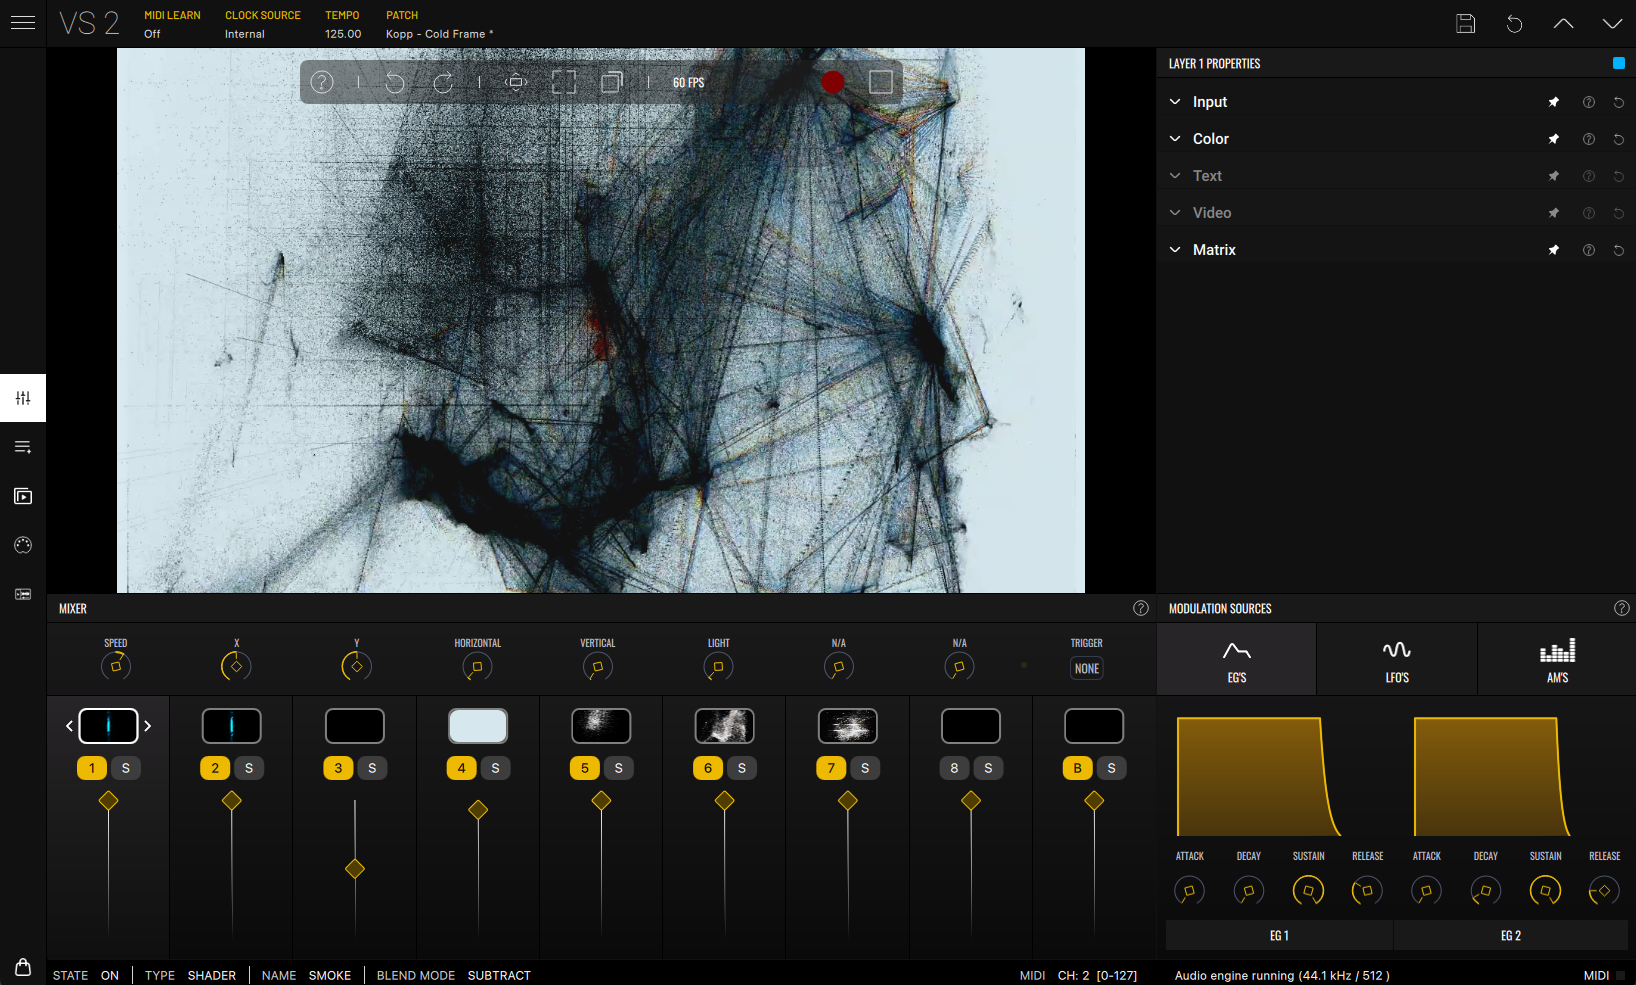
Status Bar

- MIDI Learn - Toggle MIDI mapping mode. When active, click highlighted controls to select them. Incoming MIDI messages from your connected MIDI devices will map to the selected control, letting you control VS with your sliders, knobs and notes. Double click a highlighted control to manually enter mapping information. Mappings will show in the MIDI Mapping panel.
- Clock Source (Standalone only) - Select the clock source: Internal, External MIDI Clock, or Ableton Link.
- Tempo - Set project tempo. You can use the +/- buttons, double click for manual insertion, or press and drag left and right. The Tap button allows setting tempo by tapping rhythmically.
- Patch - Displays the name of the selected patch. Click to show/hide the Patch Manager.
- Disk - Save current patch state.
- Revert - Revert current patch to its original state.
- Up Arrow - Load the previous patch in the Bank.
- Down Arrow - Load the next patch in the Bank.
Render output bar

- Help - Opens a help panel with a brief description of various render controls.
- Undo / Redo - Undo or redo the most recent changes.
- Fill Mode - Choose between crop mode — which crops the render output to fill the display — or fit mode — which will fit the render in the display without cropping.
- Full Screen - Enters fullscreen mode, showing only the render output. Double click anywhere inside the window to exit.
- Pop Out - Opens an additional separate render area window without overlays or controls. This provides a clean feed of the render output for projection or video capture, suitable for live performance and VJ use while using VS's interface controls on another screen.
- FPS Display - Shows the current rendering frame rate in frames per second. If performance is low, consider lowering the quality settings.
- Record - Records VS's render output to disk as a video file. Click once to start recording and again to stop. The file will be saved to your 'Recordings Folder’. (note: check the 'Recording Quality' option in the Settings menu, prior to recording). When used as a plug-in, press and hold to arm recording, which starts/stops with host playback.
- Render Start/Stop - Stops/resumes the rendering engine. Useful for capturing screenshots.
Render Output
Displays the render output of your session. This is what will be shown during recording or projection.
Main panel selection

Choose which panel to display in the Main panel area. In order:
- Mixer - Resembling an audio mixer, you’ll be able to control the opacity of all Layers using the sliders, as well as the parameters of the selected Layer. This is the selected panel by default.
- Playlist - Create and manage a custom preset playlist.
- Media Manager - View the media being used in Layers along with their path. You can also relink missing media.
- MIDI Mapping - Access and edit all MIDI mappings.
- Audio Player - Load audio and MIDI files to drive your visuals.
Selected main panel
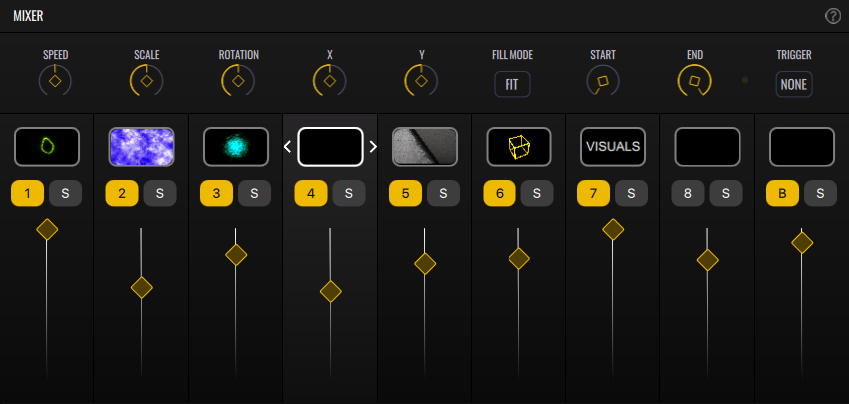
This area displays the selected panel. By default, VS starts with the Mixer panel, which provides access to Layer controls such as the opacity slider, mute/solo buttons, material-specific parameters, and the Material Browser. The title bar includes a help icon that provides a brief overview of the selected panel.
For further information about a specific panel please visit the Mixer, Playlist, Media Manager, MIDI Mapping and Audio Player sections.
Info Bar

Displays some information about the selected Layer as well as audio and MIDI status.
- State - Indicates whether the Layer is enabled.
- Type - Shows the type of loaded material (e.g. shader, image, video).
- Name - Displays the name of the loaded material. For media files, the full path is shown.
- Blend Mode - Selected blend mode (e.g. normal, add, multiply).
- MIDI - Shows the Layer's MIDI input channels and note filter settings.
- Audio status - Indicates whether the audio engine is running, along with the current sample rate and buffer size. If audio is disabled, select your audio device in the Settings.
- MIDI event indicator - A visual indicator that flashes when the Layer receives MIDI note events.
Layer Properties
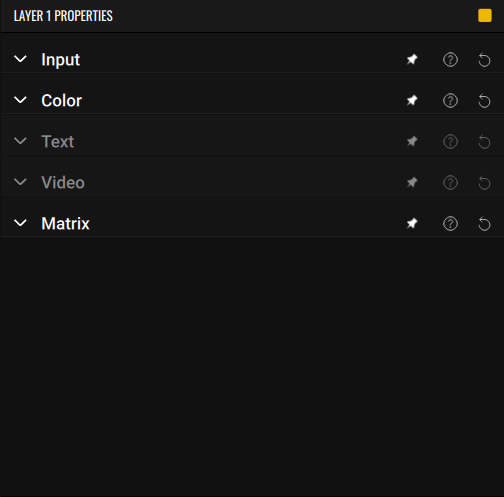
Control various Layer settings and access the Matrix to modulate both Layer and material parameters. This panel contains independent sections — Input, Color, Text, Video, and Matrix — which can be collapsed. Some are available only when relevant to the currently loaded material (eg. Text is available only when the Layer contains the Text material).
Each section includes:
- A Pin button that keeps the pinned tab on top.
- A Help button that displays a brief description of the section.
- A Revert button that resets all settings in the section to their default values.
For further information see the Layer Properties section.
Modulation Sources
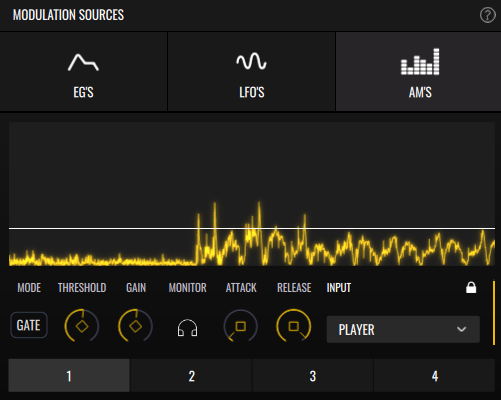
Access and configure modulation sources to use with VS’s Modulation Matrix, letting you modulate both Layer and material parameters. The 3 tabs provide access to the 2 EGs, 4 LFOs and 4 Audio Modulators. A Help button is also available, providing a brief overview of the section and guidance on how to use the modulators.
For further information see the Modulation Sources section.