Modulation Sources
The bottom right corner of VS’s interface is dedicated to the Modulation Sources.
Modulation Sources are used to create modulation signals that change the various Layer parameters, making them vary over time. These modulations are managed in the aforementioned Modulation Matrix and are responsible for introducing audio and MIDI reactivity to your visuals.
There are three different modulation sources available: EGs (Envelope Generators), LFOs (Low Frequency Oscillators) and AMs (Audio Modulators).
Envelope Generators
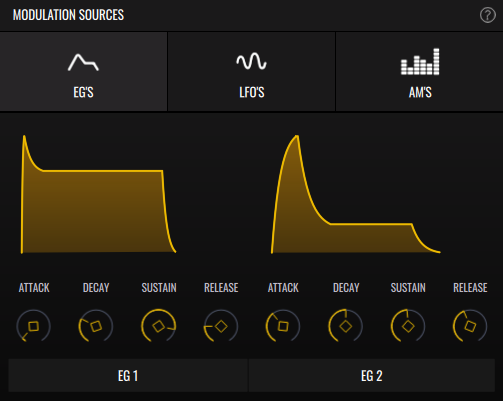
Envelope Generators create shapes that react when a MIDI note is triggered. You can use them to control a visual parameter (such as opacity, size, or glow), making it change when the note starts and ends. There are 2 EGs available, each with their own controls.
- Attack - Duration of the attack phase. Short values make an abrupt start, while long values make a long upward ramp while the note is held down.
- Decay - Duration of the decay phase. Once the attack phase finishes, the signal decays to the Sustain value.
- Sustain - Sustain level. After the Attack and Decay phases, the envelope will remain at this value until the note is released.
- Release - Duration of the release phase. Once the note is released, the envelope will decay to 0. A short release will decay quickly, while a long release will decay slowly.
LFOs
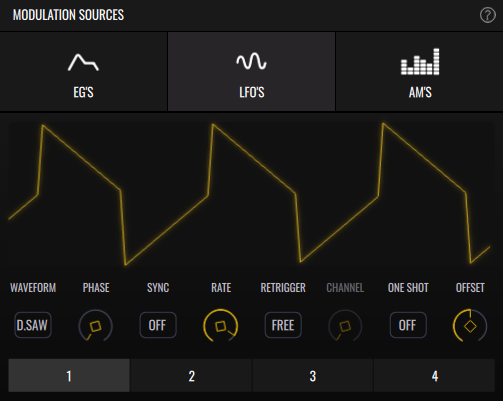
Low Frequency Oscillators are perpetually moving signal generators. They’re useful for adding independent, constant motion to visuals. They can be configured to start on MIDI notes and follow your project tempo. Four LFOs are available.
- Waveform Display - View of the generated modulation signal.
- Waveform - Shape of the generated waveform.
- Sine - Sinusoidal waveform.
- Square - Square-shaped waveform.
- Saw - Sawtooth-shaped waveform.
- Tri - Triangle-shaped waveform.
- S&H - Sample & Hold. Periodically generates a new random value.
- FS&H - Filtered Sample & Hold. Periodically generates a new random value and smoothly transitions to it with a ramp.
- D.Saw - Double Saw. Similar to a sawtooth, but inverts its direction when crossing 0.
- R.Sin - Random Sine. Makes random sine-like shapes.
- Phase - Determines the position from which the waveform cycle starts. In most cases, only relevant when Retrigger is set to ‘Key’, or Sync is enabled.
- Sync - When enabled, the oscillator Rate will synchronize to your project tempo. If VS is running as a plug-in in a host, the oscillator will restart when transport is started.
- Rate - Oscillator speed. Displayed in Hertz (cycles per second) when Sync is off, and displayed in Beats otherwise.
- Retrigger - When set to Key, the waveform cycle will restart when a MIDI note is played.
- Channel (Only when Retrigger is set to 'Key') - Filter the MIDI by channel; only MIDI from this channel can trigger a restart.
- One Shot - When enabled, the LFO will stop after a single cycle is played.
- Offset - The LFO generates a bipolar signal ranging from -1 to 1, meaning modulated parameters will range above and below their original value. The Offset pushes the signal into only the positive or negative values, turning it unipolar. Useful for when you want the LFO to modulate parameters in only one direction.
Audio Modulators
Audio Modulators receive audio from the Player or from the selected input channels of your Input Audio Device, selected in the Settings. It then generates a modulation signal following the intensity of the incoming audio. This can make your Layers react to the intensity of your music. There are 4 AMs available.
The AMs have two modes: Gate and Spectrum.
Gate
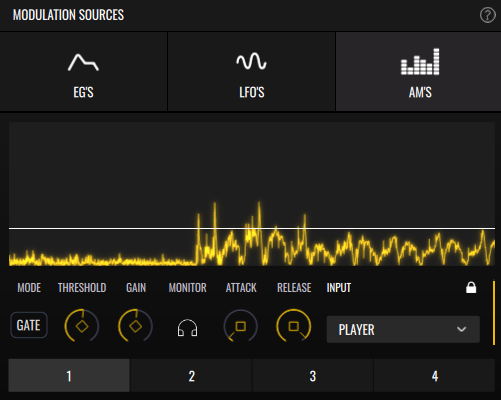
In Gate mode, the AM follows the peaks (highest amplitude values) of the sound. This can accurately detect elements with loud transients in dynamic music, such as drums and percussions in general.
Spectrum
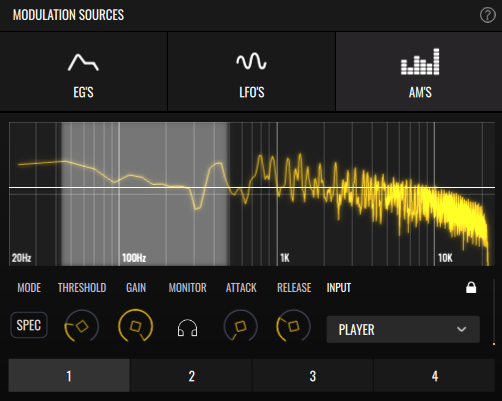
If you’re working with mastered music lacking strong transients and dynamics, Spectrum mode may prove more adequate. It works similarly to Gate mode, but you can click and drag the spectrum to isolate a specific frequency band. This can be used to try and pinpoint elements in a mix, such as bassy kick drums or hi-hats.
- Display
- In Gate mode, displays the rectified audio signal.
- In Spectrum mode, displays the spectrum of the audio signal. Click and drag to select the frequency band.
- Mode - Switch between Gate and Spectrum mode.
- Threshold - Amplitude level that the audio must cross to generate a signal. Adjust this according to the volume or intensity of your music.
- Gain - Increase the intensity of the generated signal. If you’re very precisely detecting peaks, the resulting modulator signal may be subtle; increase the Gain to amplify it.
- Monitor
- In Gate mode, toggle to hear the detected peaks.
- In Spectrum mode, toggle to hear the selected frequency band.
- Attack - Once the incoming audio crosses the Threshold, the generated modulation signal starts growing from 0. A large attack value makes the generated signal grow slowly, making it fade in. Low values make it appear abruptly.
- Release - Once the incoming audio drops under the Threshold, the generated modulation signal starts fading to 0. A large release value makes it decrease slowly, making it fade out over time. Low values make it disappear abruptly.
- Input - Select audio input. These are the input channels of your Input Audio Device. Audio from the Audio Player is always available as ‘Player’.
- Lock - Keep this AM’s state when changing through patches.
- Value Display - This vertical bar provides a helpgul visualization of the generated modulation signal.