DRC Help - Mixer
The MIXER is a central hub to where all sound sources go. Here the Oscillators get mixed before being sent to the Filter. It's in the mixer that you choose the balance between all the available sound sources. In DRC you are able to saturate the input of the FILTER and this has an effect not only in the overall tone but also in the perceived balance between different sources. After reaching a nice balance between sources you can take advantage of the PRE GAIN fader (pre-filter) to control how much signal goes to the FILTER input.
Its also in the MIXER panel that you find all the available DRC Effects. Effects are essential to add even another layer of sonical awesomeness to the DRC sound. We thought that it would be a waste of time and effort if we simply added some bread and butter DSP effects to the synth engine, it would serve no purpose to degrade what is already a really great sound. So, having access to a lot of amazing analog synths and effect boxes, we decided to study them, in order to bring out what's best in each one of them, always adding some interesting twists to the plot.
Amp
Parameters
-
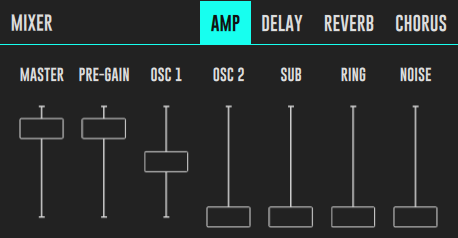
MASTER - The Master fader controls the final volume of DRC after the sound passed thru all modules.
-
PRE-GAIN - With this slider you control the amount of gain given to the output of the MIXER. This affects the amount of saturation produced in the input of the FILTER and also affects the overall perceived balance of the sources.
-
OSC 1, OSC 2 and SUB - These sliders controls the amount of the respective Oscillators being mixed and sent to the Filter.
-
RING - OSC 1 waveform gets multiplied with OSC 2 waveform producing what is known as Ring Modulation Effect. This creates a very distinct product waveform that is very sensitive to micro differences in pitch between the two Oscillators. Try changing FINE settings of OSC 2 to explore this effect. This a somewhat aggressive waveform that will fatten the overall sound.
-
NOISE - This slider controls the amount of NOISE being mixed and sent to the Filter.
Delay
The Delay effect of DRC is unique. The delay topology is inspired in classic BBD analog delay and Tape Delay topologies, but with a bunch of little tweaks that make it a very simple yet extremely powerful tool. The DRC DELAY uses modeled wow, flutter and noise typical of tape delay machines to give it a very pleasing characteristic with feedback pushed to the limits. The feedback repetitions are filtered and the cutoff frequency can be tailored from bright to very dark altering completely the behaviour of the DELAY. There are actually two separate delay lines working together and there is the possibility to SPREAD the time between left and right delay lines. There is a very unique trick employed here that makes the DELAY stereo image interact with the CUTOFF slider. On top of that this DELAY can be synced to the tempo and tuned to the notes being played, the later makes possible the use of the delay line as a Metalizer effect.
Controls
-
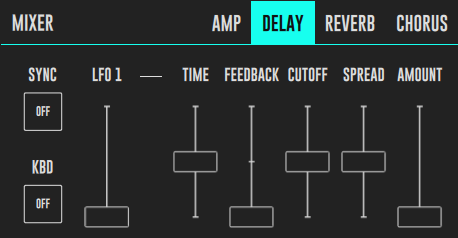
SYNC - The sync toggle button allows for the DELAY time to be synced to the main BPM. To use it, you press the button and the TIME slider becomes a detented switch, enabling the switching between 1/128 Beats going up to 2 Beats maximum.
-
KBD - The KBD toggle enables the tuned mode of the DELAY. In this mode the TIME is related to the note being played. If you play an octave above, the DELAY TIME is halved, if you play an octave below the DELAY TIME gets doubled. If you use long delays the effect is interesting but subtle, you notice a variation in the delay time, and it can be actually very interesting as it contributes to variation along the keyboard, but you cannot easily discern that it is actually musically related to the note being played because the human brain does not perceive such long delays (above 40ms) as being a musical frequency or note. If you use a very short DELAY TIME, then this effect grows a whole new interesting dimension to it, and becomes really tuned and playable. the brain starts to perceive the delay as a note and the sound becomes metalized and ringy. You can even shut down all oscillators and play only with the DELAY and FEEDBACK.
-
LFO 1 - The DELAY TIME can be modulated by LFO 1. You use the LFO 1 slider to dose the amount of modulation. To change the characteristics of the modulation waveform you need to go to the respective LFO 1 PANEL. You can achieve a lot of different things with this modulation, from subtle Wow like detuning effects to crazy Shimmer effects. Fast transitioning waveforms such as square wave have a less pronounced effect here.
Note SHIMMER DELAY: If you decrease linearly a DELAY TIME you get an increasingly higher pitched output from it. You can use a Sawtooth waveform to achieve this, albeit there is an audible transition at the repetition of the waveform, but it is most of the time actually increasing the pitch steadily. This effect, even with some artefacts is the base of the Shimmer Effect. There is a way to get rid of this unpleasing transition artefact, but it is not applicable to the DRC DELAY. To achieve this effect try modulating a long FEEDBACK DELAY with a somewhat fast SAW waveform from LFO 1. This will Shimmer form shure.
-
TIME - This slider controls the time of the DELAY. Like in a BBD or Tape Delay, here, screwing with TIME changes pitch of the delayed signal. TIME can be modulated using the LFO 1 slider.
-
FEEDBACK - The process of feedback, as the name implies, consists of feeding back the output of the delay line, back to its input. You increase the number of repetitions this way, but you can also achieve uncontrolled repetition growth, even without any sound input, because of the inherent self noise modeled into the DELAY. This is exactly what happens in real life analog delays, and a very powerful and aggressive tool. Try adjust FEEDBACK until you achieve a sustained scream from the DELAY and then play with the TIME slider.
-
CUTOFF - This slider allows for you to adjust a Lowpass Filter located at the output of the DELAY. Its after this Filter that the repetitions are fed back to the input so it has a major impact in the overall sound.
-
SPREAD - The DRC DELAY uses two distinct DELAY Lines. One is for the Left Channel and the other for the Right Channel. Using the SPREAD slider you add a little bit of extra delay to one the the delay lines, creating a powerful Stereo Effect. There are some particularities with this, because we made the DELAY such that the Filter CUTOFF interacts with the SPREAD. Listen to the difference between High CUTOFF and Low CUTOFF in a very long FEEDBACK DELAY with SPREAD at maximum.
-
AMOUNT - Here you can dose the AMOUNT of DELAY being mixed with the original undelayed signal.
Reverb
Reverb is what defines the characteristic sound of a particular space, it's made of the build up of all the different reflections on surrounding surfaces. Your synth can sound great without it, dry as a bone, but one out of ten times, a little bit of reverb contributes to make a good patch sound even better/bigger, specially when not buried deep in a cluttered arrangement.
The REVERB in DRC is not trying to emulate any particular physical space, not even a Plate (a kind of electromechanical old school reverb, although it can resemble one in some aspects). It is very lush and great for giant outer space sci-fi landscapes, which might sound artificial, but what are syths for if not to create great unrealistic sounds that seem came from another planet? We made it so outrageously big that it can actually grow beyond decay. It has internal modulation contributing for added life and complexity to the sound, or to even more abused chorus like effects as you approach the limits of the controls. We also made possible for the AMOUNT to be modulated with LFO 2 after experimenting with a DIY analog modular setup that sounded great.
Controls
-
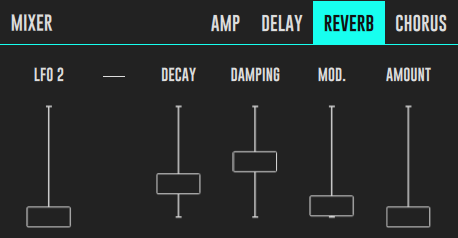
LFO 2 - This slider controls the amount of LFO 2 that is used to automate the DECAY of the REVERB, try using it with a F S&H (Filtered Sample and Hold) in LFO 2 for added weirdness.
-
DECAY - This slide control the time it takes for the REVERB to perish. If you go all the way to the extreme maximum region the REVERB will even grow pass decay and start to feed itself back. This can be bad to your speakers or ear drums if care is not taken, pay attention! There is some interaction between DECAY and DAMPING, as DAMPING affects internal feedback frequency response, and with that the all around gain of the REVERB structure.
-
DAMPING - This is a term used to describe the sound damping effect of wall materials in real rooms. In DRC REVERB the DAMPING slider changes the frequency content of the reflections, like in a room, but in a simpler way, nonetheless the effect is alike and it also affects the REVERB DECAY time.
-
MOD - This slider controls the amount of internal MODULATION applied to the reflections inside the REVERB. This modulation is independent of the LFO’s. If you use just a little modulation, the reverb gets richer, maintaining naturality, if you abuse it, the REVERB becomes a hybrid Chorus/Reverb kind of effect.
-
AMOUNT - This slider controls the amount of reverb being applied and works like a dry/wet control. At minimum you have zero REVERB, at max you only have REVERB and zero dry sound.
Chorus
Chorus in the analog synth context is an effect which thickens the sound and also widens the stereo image. It accomplishes this by mixing the unprocessed signal with a small delay that is modulated. Many great synths and string machines have used it to capture the lushness and power of a whole ensemble. In DRC we implemented two types of chorus, both true stereo inspired in the best analog examples we were able to put our hands on.
Controls
-
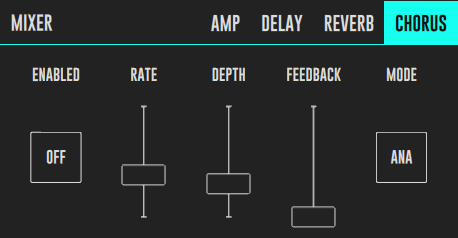
MODE - The MODE toggle button switches between the two available modes which are ANA and DIM. The two modes are identical but the DIM has some extra complexity cross feeding parts of the spectrum creating a more in your face sound while maintaining the overall desired effect.
-
RATE - This slider controls the speed or rate at which the Chorus works, you can have very slow evolving effects or very unrealistic but still great super fast chorus going on.
-
DEPTH - The DEPTH slider accounts for the depth at which the delay line is modulated. You can dial a subtle or an aggressive modulation with it. In a sense, DEPTH and RATE are somewhat related. As you increase RATE there is an apparent increase in DEPTH which you can compensate with this fader.
-
DELAY - This slider adjusts the amount of initial delay that gets modulated. Increasing it gives a sense of a bigger chorus, but at some point you lose the illusion of unity and start discerning an actual delay. All this depends on the type of sound being processed. Long evolving, transient free sounds are more forgiving. Fast transient rich sounds require shorter initial delay.
-
ENABLED - This toggle switch ON or OFF the effect.