MATRIX Panel
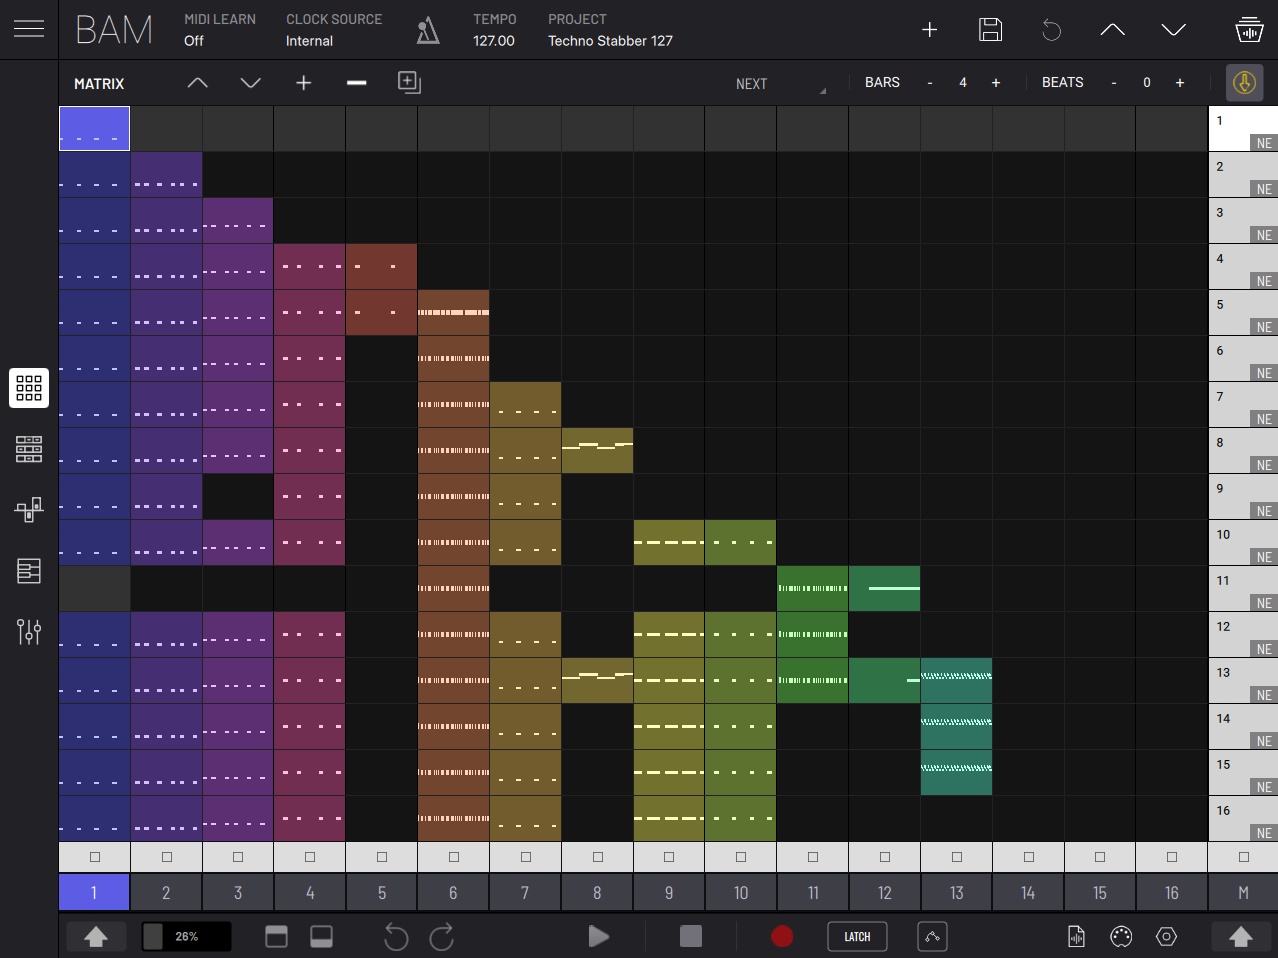
The MATRIX panel is the heart of the BAM project structure, displayed as a grid of cells containing colored MIDI clips for each numbered track, and white scene launcher buttons on the Master track (M).
Triggering a clip
To trigger a single clip simply press the clip you want to trigger. This action also selects the clip, which is shown by a white border around the clip’s cell. A clip that is in a trigger state is shaded brighter than non-trigger state clips. As a clip plays, a visual indication of its playback position is represented by a progressive horizontal shading graduating from left to right. When the end of the clip is reached, it will automatically loop back to the start of the clip and playback will continuously loop until the clip is stopped.
Pressing a different clip on the same track will select and trigger the new clip (synchronizing the start of playback based on the ‘Trigger quantisation’ project settings - accessed via the cog icon on the bottom toolbar.)
Pressing a clip from a different track will select and trigger the new clip, synchronizing the playback with currently playing clips. You can see that both clips are now selected because they both have a white border, and both clips will also have brighter shading to show they are currently in triggered state.
Selecting a clip without triggering
To select a clip without triggering it, press the clip while SHIFT is active. This will give the clip a white border which signals the clip is selected, but the shading of the clip will not change as the clip is not triggered.
Triggering a scene
Pressing a scene launcher button on the master channel will trigger playback of all clips on the same horizontal row, adhering to the project ‘Trigger quantisation’ setting.
Selecting a scene without triggering
To select a scene without triggering it, press the scene while SHIFT is active.
MATRIX clip and scene context menus
Pressing and holding or right clicking a clip or empty cell reveals a pop-up context menu to perform relevant actions:
- Copy - Copy MIDI notes, automations and audio content of the clip.
- Paste - Paste copied clip.
- Oneshot/Loop - Toggles clip looping.
- Mute
- Clear - Clear all clip content.
- Audio (Audio clip only) - Open the Audio Clip Properties panel.
- Clear Audio (Audio clip only)
- Import (iOS only) - Import MIDI file into clip.
- Export (iOS only) - Export MIDI content as a .mid file. For exporting MIDI on desktop, see Export Menu.
- Rename - Renames the clip.
Pressing and holding a track button reveals a pop-up context menu to perform relevant actions:
- Move Left
- Move Right
Pressing and holding a scene button reveals a pop-up context menu to perform relevant actions:
- Add Scene
- Duplicate
- Copy
- Paste
- Delete
- Select
- Move Up
- Move Down
- Rename
Audio Clips
Clips may play both MIDI and audio. Dragging an audio file from the Browser to a Matrix cell will load the audio into the clip. When loaded, tempo is automatically detected and the audio is time stretched to match the project tempo.
The Audio Clip Properties panel - opened through the Matrix clip context menu - can be used to manually adjust the reported audio tempo and other clip settings such as clip length and time signature.
Time-stretch quality can be adjusted in the Preferences menu.
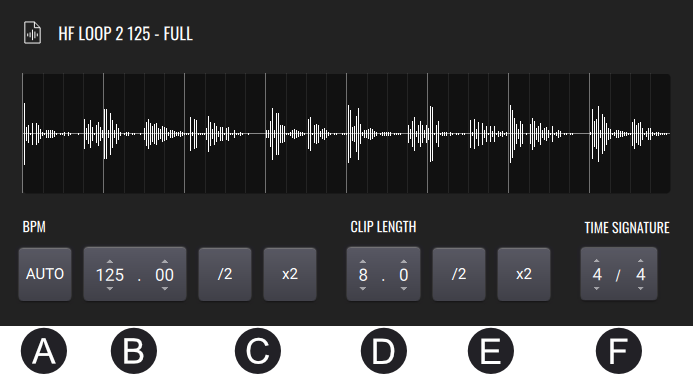
- (A) Reset to automatically detected tempo
- (B) Insert audio tempo
- (C) Halve/double current audio tempo
- (D) Change clip length
- (E) Halve/double current clip length
- (F) Change clip time signature
Note: (B) designates the tempo of the loaded audio, meaning the project will treat the audio as if its tempo were the reported value when stretching it. For instance, an audio clip with a tempo of 60 BPM in a 120 BPM project will play at twice its original speed.
Scene Follow Actions
For automatic transitions between scenes and song arrangement purposes, scenes can be assigned a follow action event to occur after a specified number of bars and beats from the moment the scene is triggered. To assign a follow action, select the scene and then use the follow action settings above the Matrix. Scenes that have a follow action assigned show a two-letter abbreviation of the follow action type. Follow actions are only applied when the scene is triggered.
If the song is stopped while a scene is running, the scene launcher and all playing clips will remain in the triggered state. Pressing the play button will launch the scene from the beginning, and continue follow actions if present. Pressing the stop button of the master track clears all triggered states. Doing this and then triggering a clip allows you to play a single clip.
The different types of follow actions are detailed below as part of the MATRIX UI overview.
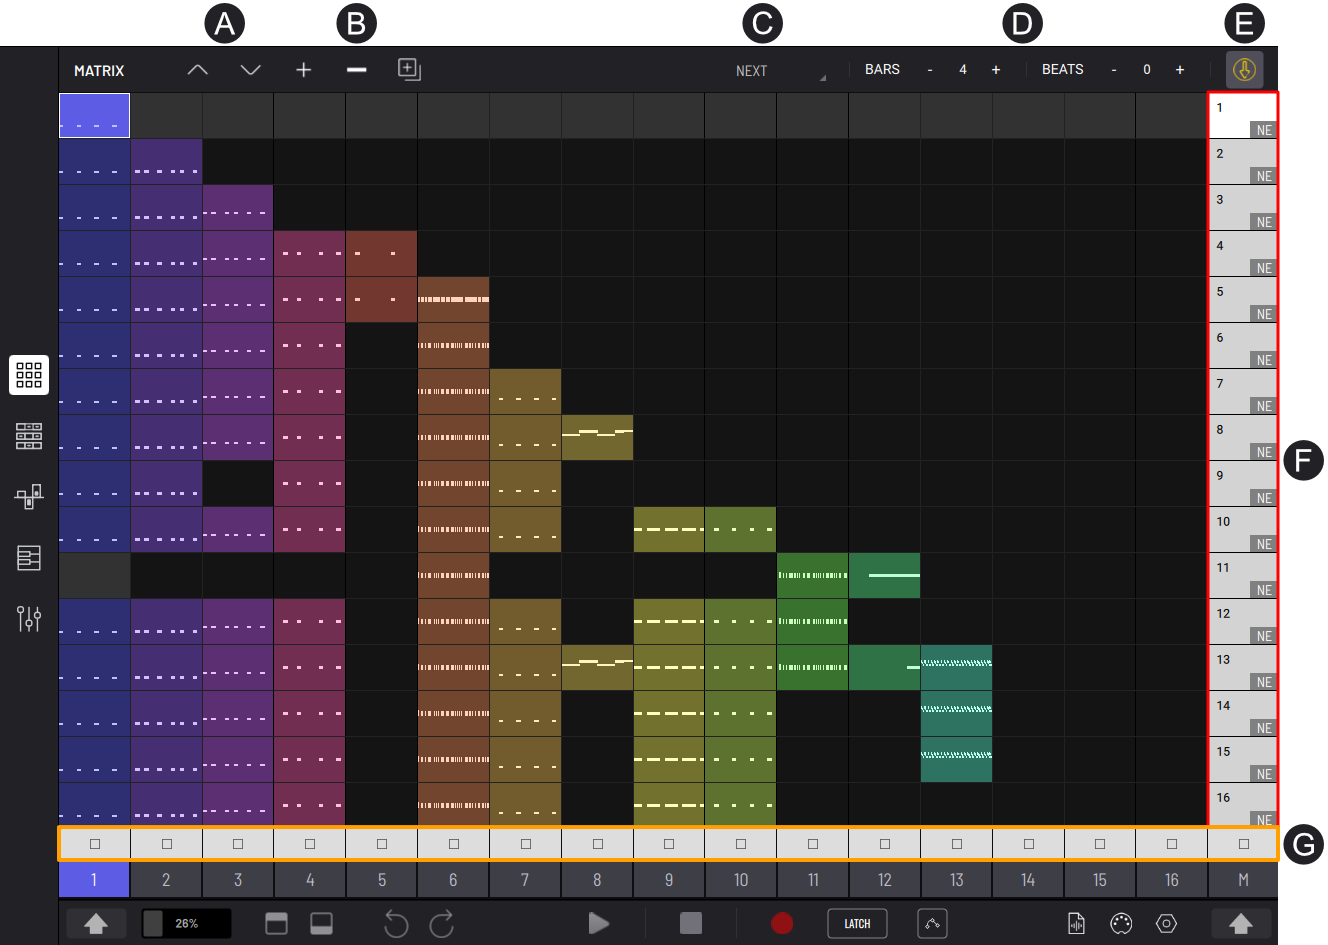
- (A) Move selected scene one position up/down
- (B) Add/delete/duplicate scene
- (C) Select scene follow action:
- None - No follow action will be applied at the end of the scene
- Next - Play next scene
- Previous - Play previous scene
- First - Play first scene
- Last - Play last scene
- RND (Any) - Play a random scene
- RND (Other) - Play a random scene excluding the currently playing scene
- Last Playing - Play last playing scene
- Stop - Stop playback of project
- (D) Number of bars and beats to play before follow action event occurs
- (E) Enable follow actions
- (F) Scene launch buttons
- (G) Track stop buttons
Pressing a track stop button will stop that track's playing clip. Pressing the master track stop button stops all playing clips as well as removing all triggered states.
You can access additional functions for some tools by using them with the SHIFT button engaged, which is located at the bottom right corner of the app.
SHIFT functions:
- Duplicate single clips by dragging
- Select clips/scenes without triggering