Layer Manager

The Layer Manager allows you to select layers, load materials via the material browser and set the Z index (stacking order) of the layers.
There are 8 numbered material layers, plus one background layer, ‘B’. The background layer can use either a video or image file; it cannot load materials. Background layer honours selected color when no media is loaded. By default the background layer color is black.
Each layer item has a live preview of its current material. If the layer is disabled, the preview changes to black. (Animated thumbnails can be toggled in settings menu)
Layers are rendered in a stack; the leftmost layer is top, and the very bottom layer is the background layer on the right. To reorder the layers, click and drag each layer to the new desired position.
Note: The background layer cannot be moved.
Clicking and holding a layer will open its additional options:
- Materials - open the material browser
- Copy - copy the layer that is in the selected slot to memory
- Paste - paste the layer that is in memory into the selected slot
- Reset - open the reset layer form
The reset layer form has three options:
- Material - resets the layer to the default 'plain color' material
- Reset Material Parameters - resets the layer's material parameters to their default values
- Reset Modulation Matrix - resets the layer's modulation matrix values
Clicking and holding the background layer opens the following options:
- Files - Open a document picker where you can select an image or video
- Photos - Open the iOS photo picker (iOS only)
- Reset - resets background media
The layer manager has four other buttons; to the left of the layers is the circle icon, which opens and closes the color panel, and to the right of the layers there are three buttons to access the modulation section, the modulation matrix, and the audio/MIDI file loader.
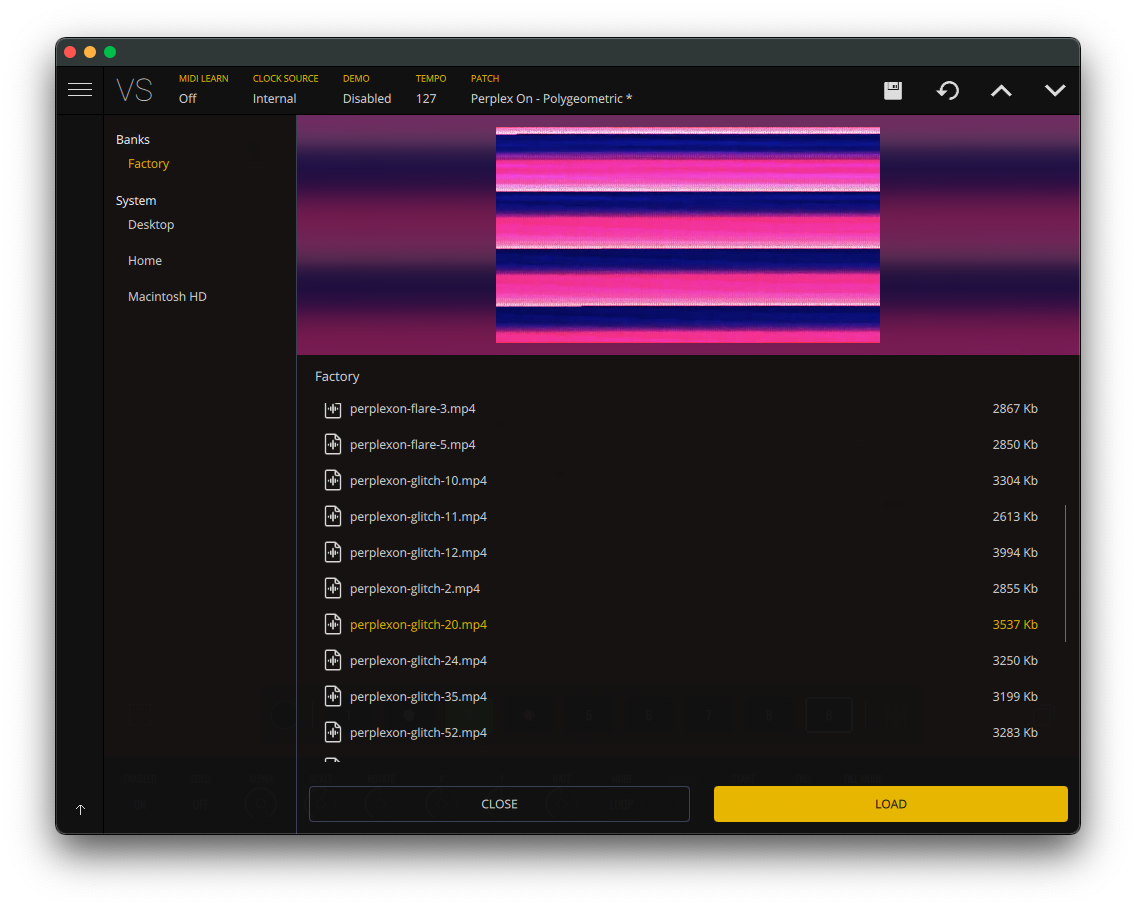
Audio/MIDI file loader

The Audio/MIDI file loader lets you load and playback both audio and MIDI files, for VS to use as modulation sources to create visuals from. To load a file, click the directory icon on the right of the panel, then select a compatible filetype. (.MID .Wav .Aiff). Once the file has loaded, you can control playback with the three transport buttons located on the left of the panel, 'play', 'stop' and 'toggle looped playback' respectively. You can also click any part of the audio waveform to play from that position.
VS comes loaded with a number of demo tracks, which contain both audio and MIDI parts. These can be accessed and loaded when the Audio/MIDI file is open, by selecting Banks > Demo at the top left.
Color Panel
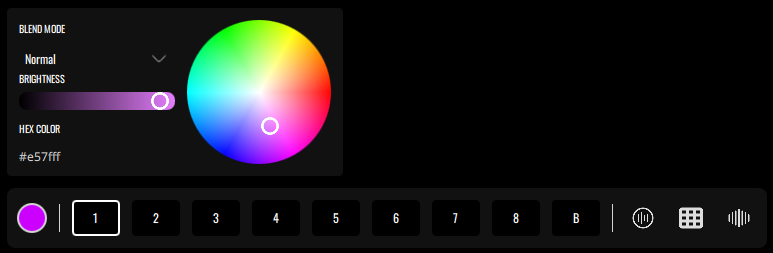
On top you can choose the blend mode that will be applied. Normal is the default option. There are also the following modes: Screen, Hard Light, Soft Light, Overlay, Difference, Exclusion and Subtract (these are explained below).
Clicking inside the color wheel sets a layer’s main color by altering hue and saturation values, alternatively you can manually enter a specific hex color value, and also change the layer's brightness setting with the slider.
Blend modes alter how a stack of layers is rendered by changing the way that layers interact based on different operations on color information from the layers.
- Normal - The default mode is ‘Normal’ - where pixels are drawn ‘on top of each other’, effectively covering up the pixels of any layers below
- Screen - Looks at each channel’s color information and multiplies the inverse of the blend and base colors. The effect is similar to projecting multiple photographic slides on top of each other
- Hard Light - Multiplies or screens the colors, depending on the blend color. This is useful for adding shadows to an image
- Soft Light - Darkens or lightens the colors, depending on the blend color
- Overlay - a gentle multiplication of colors, both layers preserve details
- Difference - a kind of psychedelic 70’s effect, with high contrast, inverted colors
- Exclusion - similar to difference, but desaturated/washed out colors
- Subtract - creates a darker image by subtracting brightness
Tip: if you are tweaking existing presets by playing with their layers and are getting unexpected results, perhaps check the current blend mode setting and try changing modes.
Material Browser
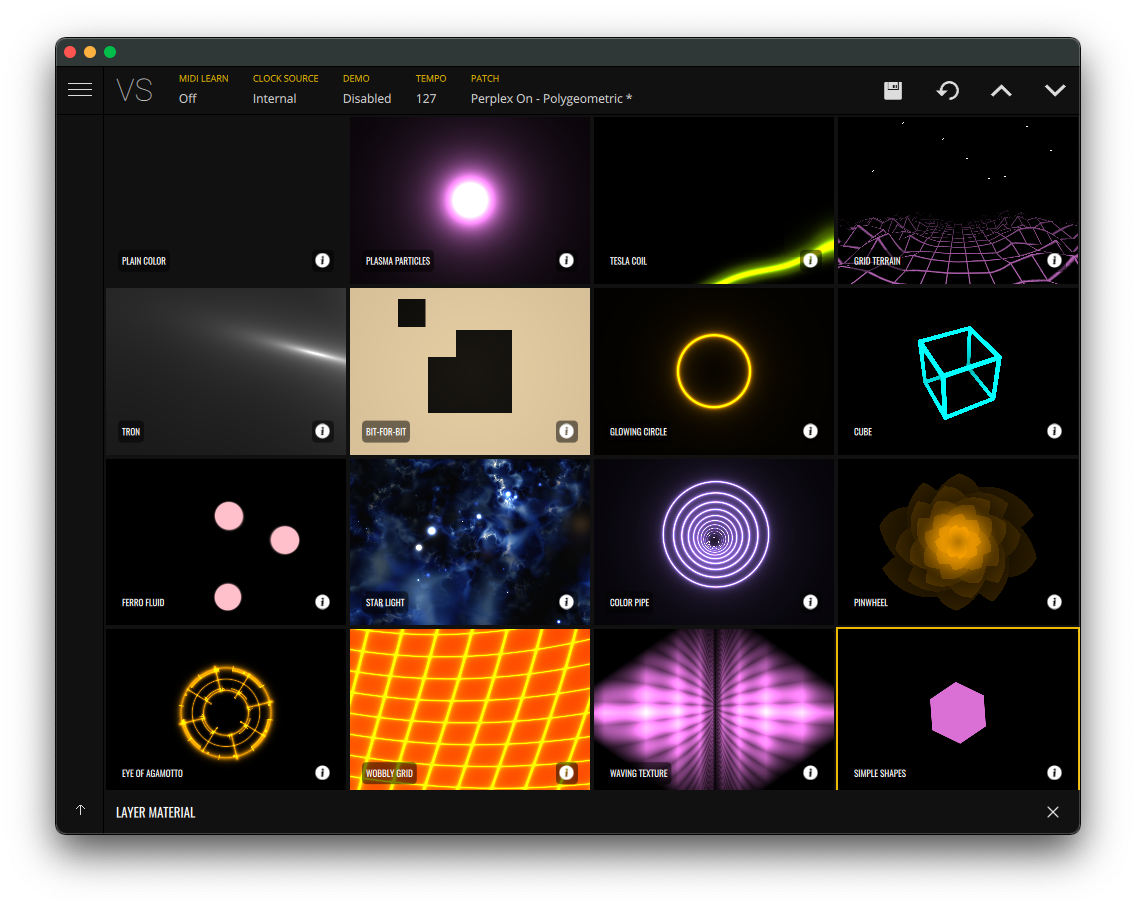
To open the material browser, double click any numbered layer.
Materials are presented in a scrollable grid, with an animated preview for each material.
At the top of the material browser window you can choose which bank of materials to view. By default, 'FACTORY' bank is selected. There is also a 'USER MATERIALS' bank where you can browse, manage and edit custom materials.
The currently loaded material is indicated by a yellow outline. Click any material to load it into the selected layer. When a new material is loaded, the layer’s color property does not change, the new material will use the layer’s currently selected color.
Note: loading a new material resets all layer material parameters. If the same material is reloaded, material parameters are preserved.
Each material contains an info button, and an options button which displays the available actions:
- Edit - Opens the material editor
- Clone - Creates a copy of the material with a unique identifier
- Export - Exports the material
- Delete - Deletes the material
- Rename - Renames the material
Note: 'FACTORY' bank is read only, this means that you will only be able to 'Clone' materials from this bank.
Material Editor
Materials are programs that run on the GPU (Graphics Processing Unit). These programs are written in GLSL shader programming language and are commonly called fragment shaders.
VS materials follow a structure similar to ISF (Interactive Shader Format) but the two formats are not identical/compatible with each other. This means that if you import an ISF shader as a new material into VS, it will not work.
Each material's source code starts with a manifest (commented JSON block) which declares the material's properties/parameters. Here is an example:
/*
{
    "author": "",
    "color": "white",
    "movement": true,
    "parameters": [
        {
            "default": 0.5,
            "name": "x"
        },
        {
            "default": 0.5,
            "name": "y"
        },
        {
            "default": 0.75,
            "name": "spread",
            "min" : 0.1,
            "max" : 5,
        }
    ],
    "url": "",
    "uuid": "babfc75f-178c-44e3-9ef5-89208122f156"
}
*/
Note: in order for a material to be considered valid it must have a valid manifest, otherwise it won't be processed.
Every material manifest must have the following properties:
- uuid - a unique identifier (you can create new uuids at https://www.uuidgenerator.net/). When a material is cloned, a new uuid is automatically generated.
- color - a default color (it could be an SVG (Scalable Vector Graphics) named color or a hex string starting with #, eg: #ff0000)
- movement - (either 'true' or 'false') if set to true, this will enable the speed layer parameter
- parameters (optional) - an array of JSON objects with name, default, min (optional), max (optional) properties
- url (optional) - an url to material's author/source
- author (optional) - the author of the material
The example material above declares three parameters: 'x', 'y' and 'spread', which automatically become available as variables for use in the code.
There are some specific pre-declared environment variables to be aware of, these variables are:
- time - highp float variable that is linked with the speed parameter of VS
- opacity - highp float variable that is linked with the brightness of the layer color
- alpha - highp float variable that is linked with the layer alpha parameter
- color - highp vec4 variable that is linked with the layer color
- resolution - highp vec2 variable that has the viewport resolution
- texCoord - highp vec2 variable that has the texture coordinates normalized between 0 and 1
Cloning materials from the 'FACTORY' bank is the best way of learning how a VS material works and create new ones. You can also import materials using the import button, located in the top bar of the material browser. VS only accepts files which have .frag extension.
VS built-in material editor consists of a text editor, with a live preview window and a set of knobs representing the standard and custom material parameters.
When you clone a material, it will automatically open the editor window. If you want to edit a material, choose the 'USER MATERIALS' bank, click on the options button of the desired material and then choose 'Edit'.
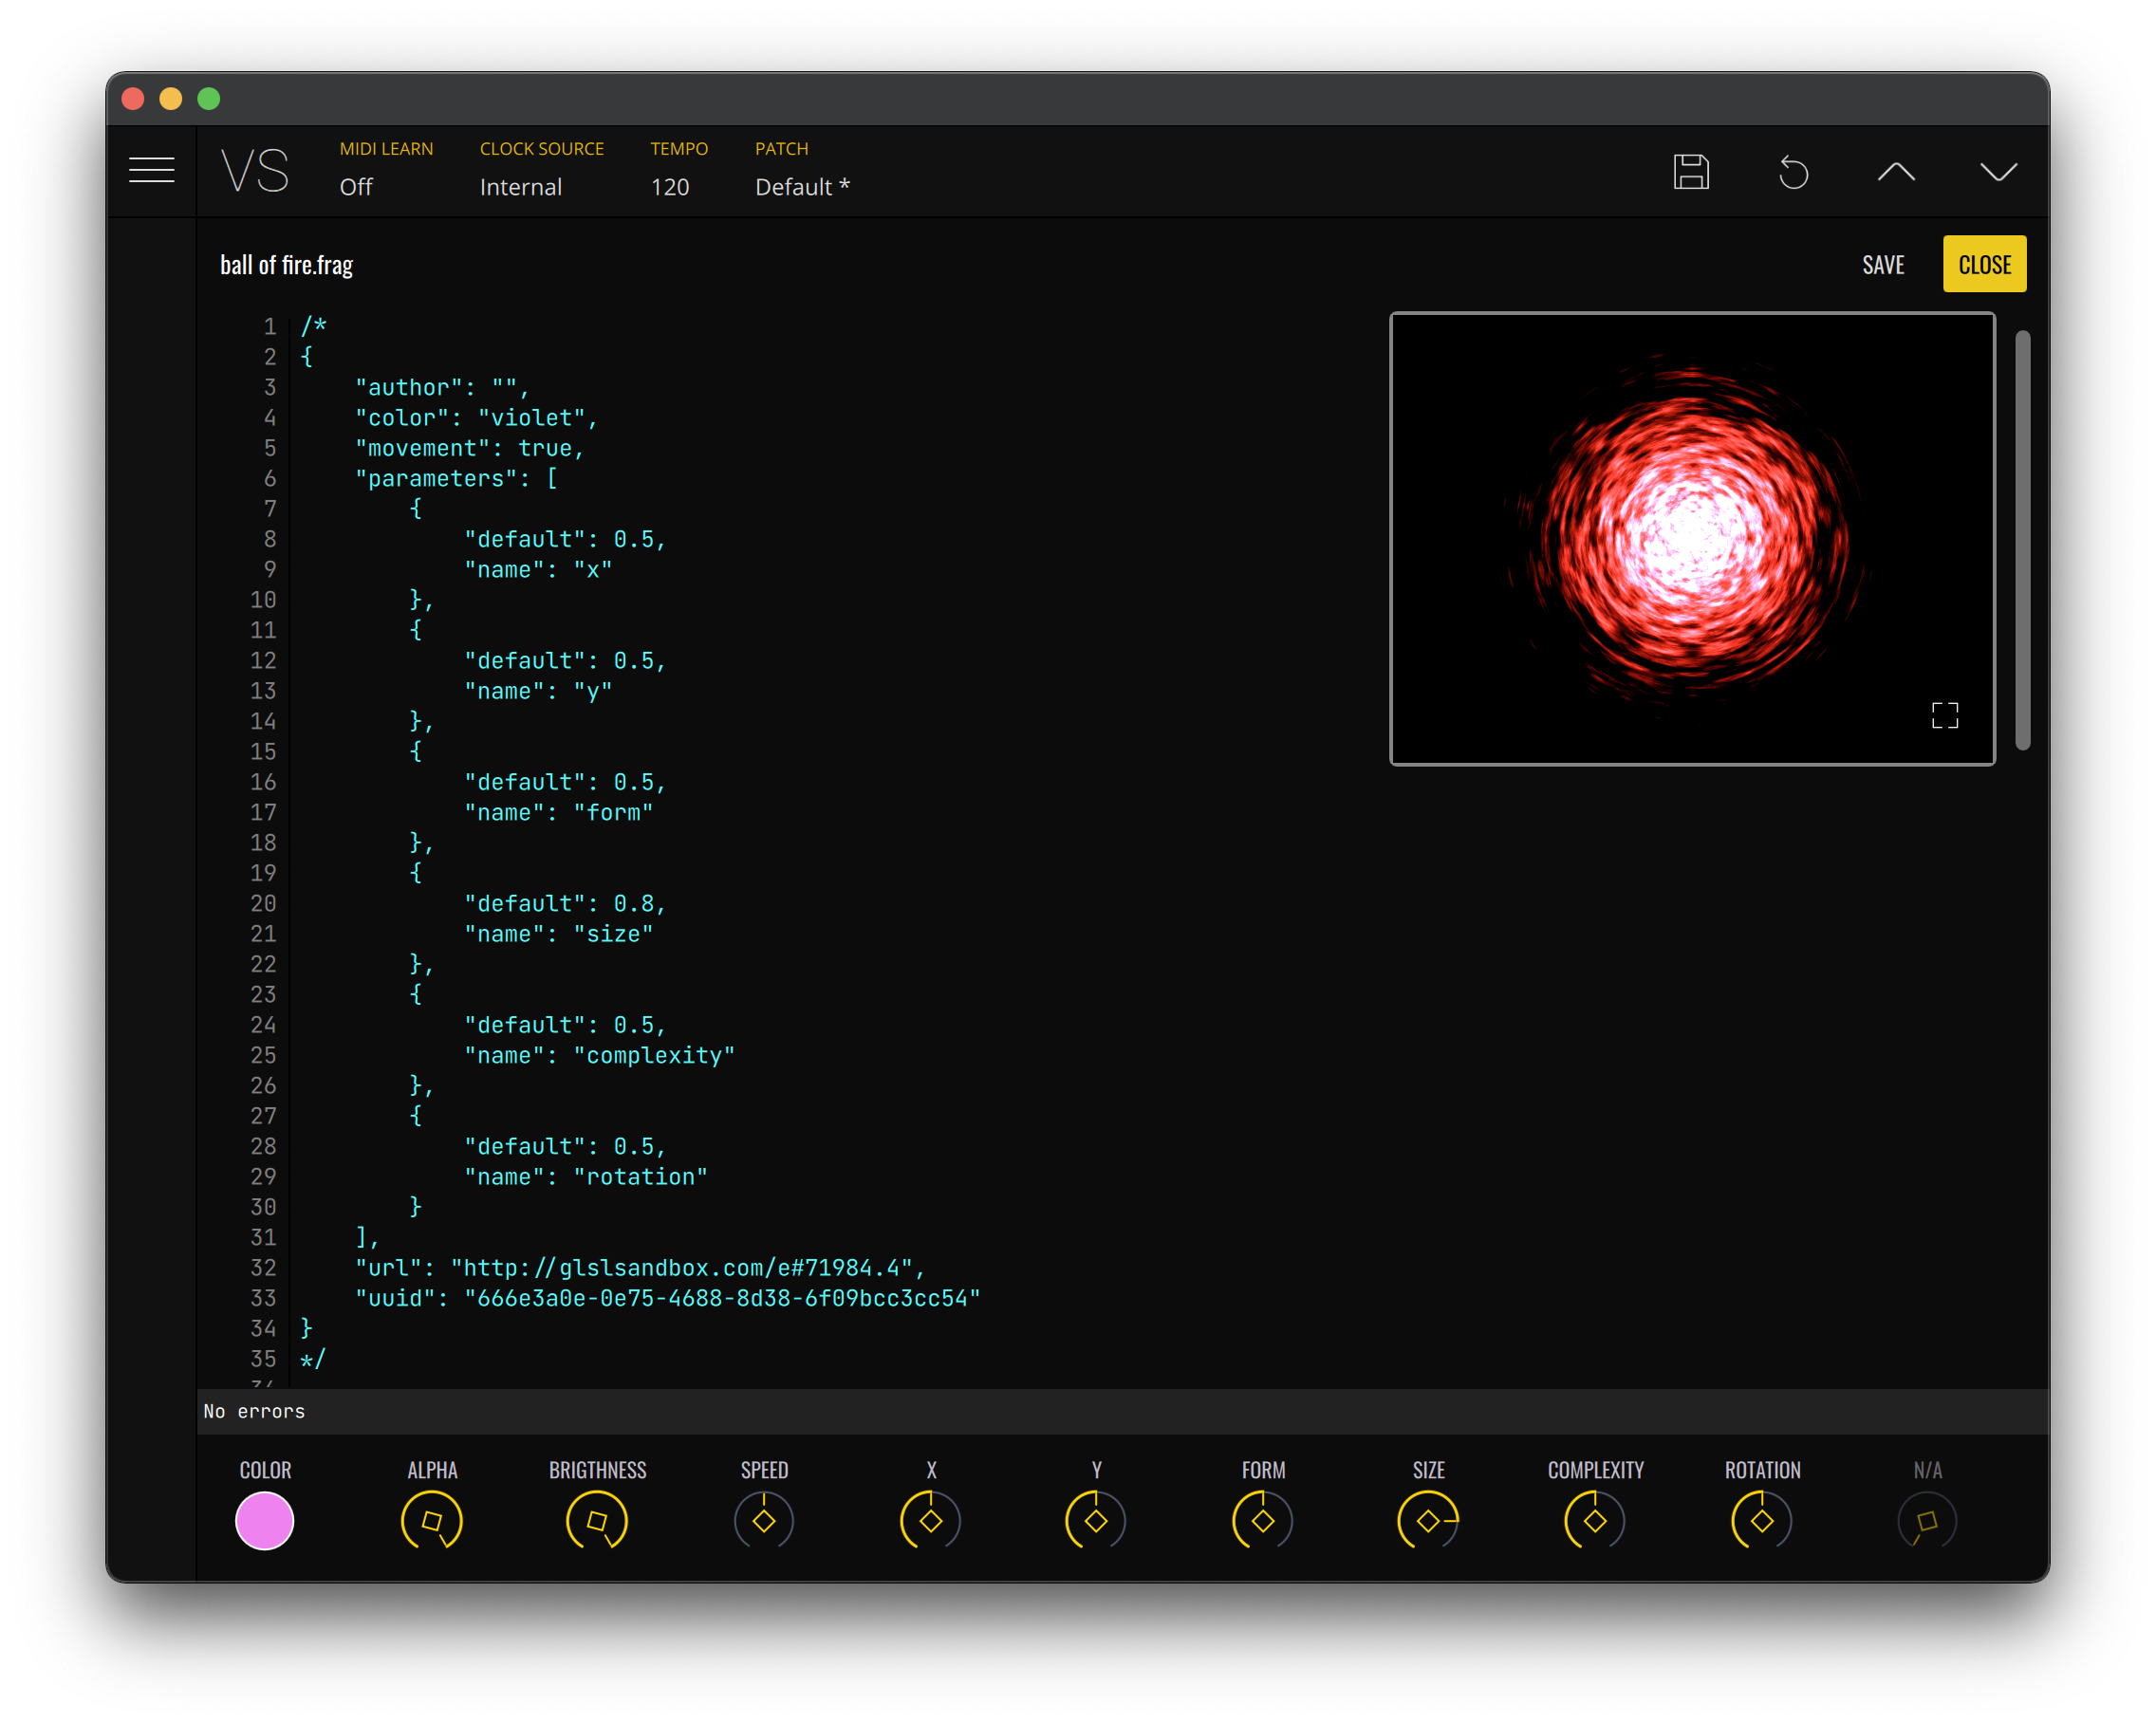
Everytime you make a change in the code, the material will be updated. If there are no errors and if the code is right, you will see something happening in the preview window.
The preview window can be moved by dragging it, and can be made full screen by clicking the full screen button inside of it. To close the full screen preview, double click on the preview area.
It is beyond the scope of this documentation to teach you how to write GLSL fragment shaders, as this is an highly complex topic that requires a good background understanding of computer graphics, as well as a deep knowledge of mathematics. (Something that we are by no means masters of!).
Still, if you are brave enough to take on this challenge yourself, we recommend reading 'The Book of Shaders' as a starting point. It is an incredible online resource about how to write your own shaders, written by Patricio Gonzales Vivo.
However we do feel that it is important to mention some of the most basic caveats of converting a typical GLSL fragment shader code to be compatible with VS.
Let's take as an example the circle shader code that is on The Book of Shaders.
If you paste the following code into VS material editor after the manifest, it will only show green and it will display an error as u_resolution is not a declared variable.
float circle(in vec2 _st, in float _radius)
{
    vec2 dist = _st-vec2(0.5);
	return 1.-smoothstep(_radius-(_radius*0.01), _radius+(_radius*0.01), dot(dist,dist)*4.0);
}

void main()
{
	vec2 st = gl_FragCoord.xy/u_resolution.xy;
	vec3 color = vec3(circle(st,0.9));

	gl_FragColor = vec4( color, 1.0 );
}
If we replace u_resolution for resolution, a variable that is automatically declared by VS' render engine, no more errors will be displayed and the preview will turn black. But why can't we see anything happening yet?
If you drag the window to the top-left side of the editor window, you will see a deformed white circle being drawn.
In order to paint inside the preview window, let's take advantage of the 'texCoord' variable that holds the normalized texture coordinates. In order to do this, replace the line:
vec2 st = gl_FragCoord.xy/u_resolution.xy;
with
vec2 st = texCoord;
Now, the circle is positioned withing the bounds of the preview window. But we can't really call this a circle, can we?
Since texCoord holds normalized positions, it doesn't take into account that the display window might have a different aspect ratio than a square therefore, we need to calculate the ratio ourselves. This is actually something we do a lot in the factory provided materials. If you replace:
vec2 st = texCoord;
with
float div = resolution.y/resolution.x;
vec2 aspect = vec2(1.,div);
vec2 st = texCoord*aspect;
You will see that the circle now has the right proportions, but it is going outside of the window bounds. With some other minor tweaks we end up with the following code:
float circle(in vec2 _st, in float _radius)
{
    vec2 dist = _st;
	return 1.-smoothstep(_radius-(_radius*0.01),
                         _radius+(_radius*0.01),
                         dot(dist,dist)*4.0);
}

void main()
{
	float div = resolution.y/resolution.x;
    vec2 aspect = vec2(1.,div);
	vec2 st = texCoord*aspect-vec2(0.5, 0.5*div);

	vec3 color = vec3(circle(st, 0.3));

	gl_FragColor = vec4( color, 1.0 );
}
So now that we have a centered circle drawn in the preview, let's take advantage of the built-in variables, so we can control alpha, color, and brightness. Then add parameters to control the circle's x, y position and radius.
/*
{
    "author": "",
    "color": "violet",
    "movement": true,
    "parameters": [
        {
            "default": 0.5,
            "name": "x"
        },
        {
            "default": 0.5,
            "name": "y"
        },
        {
            "default": 0.1,
            "name": "radius",
			"min": 0.1,
			"max": 2
        }
    ],
    "url": "",
    "uuid": "1823757c-871c-4057-baee-8c69a8ff1ff8"
}
*/

#ifdef GL_ES
precision highp float;
#endif

float circle(in vec2 _st, in float _radius)
{
    vec2 dist = _st;
	return 1.-smoothstep(_radius-(_radius*0.01),
                         _radius+(_radius*0.01),
                         dot(dist,dist)*4.0);
}

void main()
{
	float div = resolution.y/resolution.x;
    vec2 aspect = vec2(1.,div);
	vec2 st = texCoord*aspect-vec2(x, y*div);

	vec3 c = vec3(circle(st, abs(sin(time))*0.4+radius));

	gl_FragColor = vec4( color.rgb*c*opacity, alpha);
}
And there you have it, a really basic new material. The circle is complete.
Note: a material can have up to seven parameters. Any additional parameters will be ignored.
Note: declaring a parameter or a variable that has the same name as any of the pre-declared variables will result in an error
To exit the material browser without loading a new material, click the ‘CLOSE’ button located at the top right of the screen.
Media browser
To open the background image/video media browser, double click or long press the background layer ‘B’. You can then navigate your local filesystem for supported file types.
Select any file to display a preview, then choose to either load the selection into the background layer, or cancel the operation using the close button.
You can also choose to reset the layer to a blank background.
Note: supported files extensions are: jpg, png, mp4, mov, and gif.
Note: the in-app file browser has a file delete function. Use it carefully as it deletes the file from your file system.
Note: the iOS version opens the native file browser.