Matrix Module - LK Help
The Matrix module is a controller for Ableton Live and other MIDI software/hardware, carefully designed to give you access to the most common functions and operations for Ableton Live’s Session View (LIVE Mode), or for use as a MIDI mobile workstation (MIDI Mode). Tap LIVE or MIDI in the status bar to toggle between modes.
Ableton Live users please note: using the Matrix module requires the installation of the LK control surface. For more information on how to install the LK control surface please visit the Setup section.
The Matrix module is composed of several subsections and hidden menus. At the top of the screen, in the status bar, you will find the following fields:
- MODE - Toggle between LIVE and MIDI mode. For use with Ableton Live, this must be set to LIVE.
Live Mode
- POSITION - Shows the current arrangement position.
- TEMPO - Displays current session tempo and allows BPM adjustments. Use Tap to set tempo by tapping.
- METRONOME - Enables Live's metronome.
- PITCH - Show/hide the tempo nudge buttons and pitch slider.
- OPTIONS - Opens the Matrix Settings panel.
MIDI Mode
- MIDI LEARN - Enabled MIDI Learn mode for mapping incoming MIDI to LK's controls.
- CLOCK SOURCE - Toggle between Internal, MIDI clock, and Ableton Link.
- TEMPO - Displays current session tempo and allows BPM adjustments. Use Tap to set tempo by tapping, enable the Metronome and adjust its volume, and enable MIDI clock output.
- PROJECT - Opens the patch browser.
- SAVE ICON - Saves the current patch.
- REVERT - Reverts unsaved changes.
- OPTIONS - Opens the Matrix Settings panel.
Matrix Settings
General
- Song Model (LIVE MODE) - When Include chain (slower loading) is enabled, all chain devices inside each Ableton Live Rack will be loaded and available for edit. Otherwise, only the main device will be loaded and available.
- Signature - Project time signature.
- Trigger Quantization - Adjust the clip triggering quantization.
- Recording Quantization - Adjust the clip recording quantization.
- Recording Countdown (MIDI MODE) - Add a countdown before recording starts.
- Recording Fixed length (MIDI MODE) - Default clip size for clips created by starting a recording.
- Default clip length (MIDI MODE) - Default clip size for manually created clips.
Performance
- Gate launch mode support (LIVE MODE) - When enabled, Matrix clips are triggered using Ableton's 'Gate' launch mode. (Press and hold to play the clip, then release to stop.)
- Sync controllers at startup (MIDI MODE) - On opening LK, if a supported controller is connected, sync the controller to the project.
- Start recording on scene launch (MIDI MODE) - Create and record clips for armed tracks when launching a scene.
- Select slot on fire - Triggering a slot also selects it.
- Arm track when selected - Selecting a track also arms it.
- Auto scroll grid to selected scene - When a scene is selected, the viewport scrolls to display it.
- Allow program change messages to switch project - Select a MIDI input device and MIDI channel. Program change messages from this device and in this channel can be used to change projects.
User Interface
- Show viewport navigator - Show a floating viewport scroll aid.
- Cell Width - Display width of the tracks (and clip slots).
- Cell Height - Display height of the scenes (and clip slots).
Transport Controls Menu Bar
Across the bottom of the screen you will find the transport bar with the following icons/buttons (left to right):
- SHIFT - Modifies the function of certain buttons on the Matrix module. You can either hold shift, or double tap it to toggle on and off. Shift can be used to duplicate clips and notes via drag and drop. You’ll also be able to select clips without triggering them, and arm/solo multiple tracks.
- PLAY - Start playback.
- STOP - Stop playback.
- RECORD - Start recording. In LIVE mode it also starts playback.
- LOOP (LIVE MODE) - Enable region loop.
- OVERDUB - Recording notes are added to the clip rather than replacing existing notes.
- JUMP BACK
- MIDI MODE - Select previous track. When shift is pressed, select previous scene.
- LIVE MODE - Rewind the song position back by one beat.
- JUMP FORWARD - forwards the song position by one beat.
- MIDI MODE - Select next track. When shift is pressed, select next scene.
- LIVE MODE - Move the song position forward by one beat.
- UNDO - Undo the most recent change/action.
- REDO - Redo the most recent undone change.
- MIXER - Show the mixer section, featuring volume, pan, solo and mute controls.
- RETURNS (LIVE MODE) - Show return tracks.
- CROSSFADE (LIVE MODE) - Show crossfader control.
- MIDI ROUTING (MIDI MODE) - Show MIDI input and output channels and devices in the tracks.
- FULLSCREEN - Show the status and module selection bars.
- COMPOSER - Show the composer for the selected clip.
- SHIFT
Clip Grid
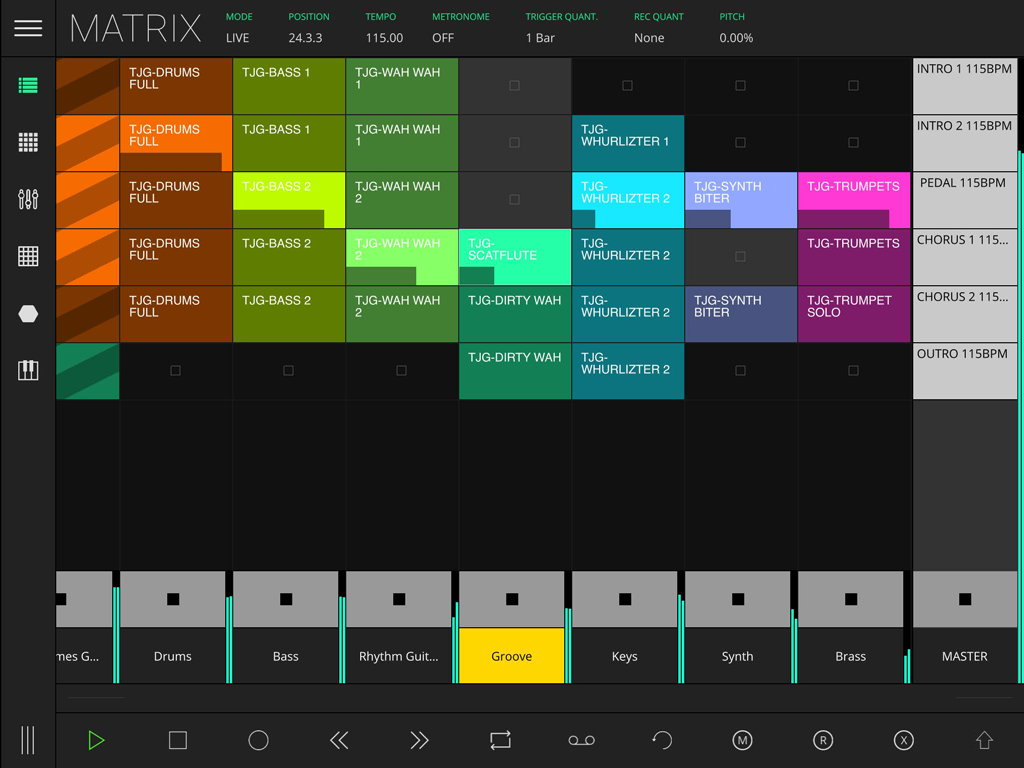
Occupying most of the screen is the clip grid. In LIVE MODE, this view reflects your Ableton Live session view.
It consists of tracks, scenes, clips, a transport bar across the bottom and an inspector zone that can be opened using the bar on the top of the transport zone. The inspector zone holds the devices and sends sections (in LIVE MODE) and the composer section.
You can change the size of the clip grid by going to the Matrix Settings menu on the Main Menu and adjusting the "Cell Width” and "Cell Height" settings.
Tracks
Tracks are displayed vertically, from left to right, each track occupying a single Matrix column, with the Master track on the right. The clip grid can be scrolled/navigated by dragging anywhere within the clip grip.
Each track consists of, from bottom to top, the following:
- Name - Press to select the track.
- Monitoring (LIVE MODE) - Select monitoring mode for the track.
- Arm - Arm track for recording.
- Stop - When pressed, sends a stop message to that track’s active clip. It will stop accordingly to trigger quantization, so everything stays in sync.
Toggling the Mixer button in the bottom bar displays additional controls.
- Solo/Mute (WITH MIXER OPEN) - Solo and mute track.
- Pan
- Volume
Long-pressing the track name opens the context menu:
- Add Track - Add a new track one position ahead of the selected track.
- Delete
- Duplicate
- Rename
- Move Right (MIDI MODE) - Moves track forward one position.
- Move Left (MIDI MODE) - Moves track backward one position.
- Properties - Show side bar for editing track name and color. Changing the track color changes the color of all its clips.
Note for MIDI MODE: When using MIDI mode, you can choose the other LK modules as track inputs. This way you can record clips using the MIDI output of your desired modules. If you’re using LK as an AUv3 unit, you can receive and send MIDI information in your tracks by using the “LK Input” and “LK Output” as your track’s input and output respectively.
Master Track
The master track features additional controls that affect all tracks.
- Name
- Trigger previous scene
- Trigger next scene
- Cue volume
- Pan (WITH MIXER OPEN) - Display pan controls for all tracks.
- Volume (WITH MIXER OPEN) - Display volume controls for all tracks.
- Stop - Stop all active clips in all tracks.
Scenes
The Master track, on the right side of the interface, contains the scene launch buttons.
Tapping on a scene launch button triggers all the clips in that row.
Long-pressing the scene button opens the context menu:
- Add Scene - Add a new scene one position ahead of the selected scene.
- Duplicate
- Move Up (MIDI MODE) - Moves scene backward one position.
- Move Down (MIDI MODE) - Moves scene forward one position.
- Delete
- Rename
- Properties - Show side bar for editing scene properties such as name, color, and follow action along with time and probability controls.
Clips
To create a new clip simply double tap an empty grid cell (any cell containing a stop button). The created clip will have the selected Default clip length. You can also create one using the composer section.
Tapping a clip will trigger it, and it will start to play accordingly to the sessions trigger quantisation, keeping sync. To select a clip without triggering it, use the shift modifier button. The selected clip shows a thin, white border.
Long-pressing a clip will open the context menu:
- Copy - Copy the clip, letting you paste it onto other slots. You can also copy and paste clips by dragging and dropping while shift is pressed.
- Cut
- Paste
- Mute
- Delete
- Set as background clip - Display this clip's notes dimly while editing other clips.
- Import MIDI (MIDI MODE) - Create a new clip from an external MIDI file.
- Export MIDI (MIDI MODE)
- Properties - Open the Clip Tools menu.
- Clip Actions (MIDI MODE) - Open the Clip Actions menu. When a clip has actions, an icon is displayed in its top right corner.
When a clip is playing, a solid rectangle along the bottom edge of the clip displays the playing position of the clip, from left to right.
Playing and recording clips
The clips in the Matrix have the same behavior as the session clips in Ableton Live, meaning that tapping on an existing clip will play it, while tapping again on the clip will relaunch it. Similarly, tapping on the scene launch will trigger the corresponding row of clips and tapping it again will relaunch the exact same row.
The stop button for the clips or scenes can be found at the clips zone in the corresponding track, represented by a black square on a grey background.
If a track is armed in the Mixer section (either if it is a MIDI or an audio track), tapping on a blank clip will automatically create a new clip and start a recording. If Recording Fixed Length is enabled, the recording stops when the clip reaches that length.
Inspector panel
Right above the transport bar there is a split view bar; tap to minimize/maximize the Inspector panel. You can also press and drag the == icon to adjust its size.
The Inspector panel consists of:
- COMPOSER - View and edit the selected clip contents.
- DEVICES (LIVE MODE) - Browse and edit the selected track devices.
- SENDS (LIVE MODE) - Edit the selected track's send volumes.
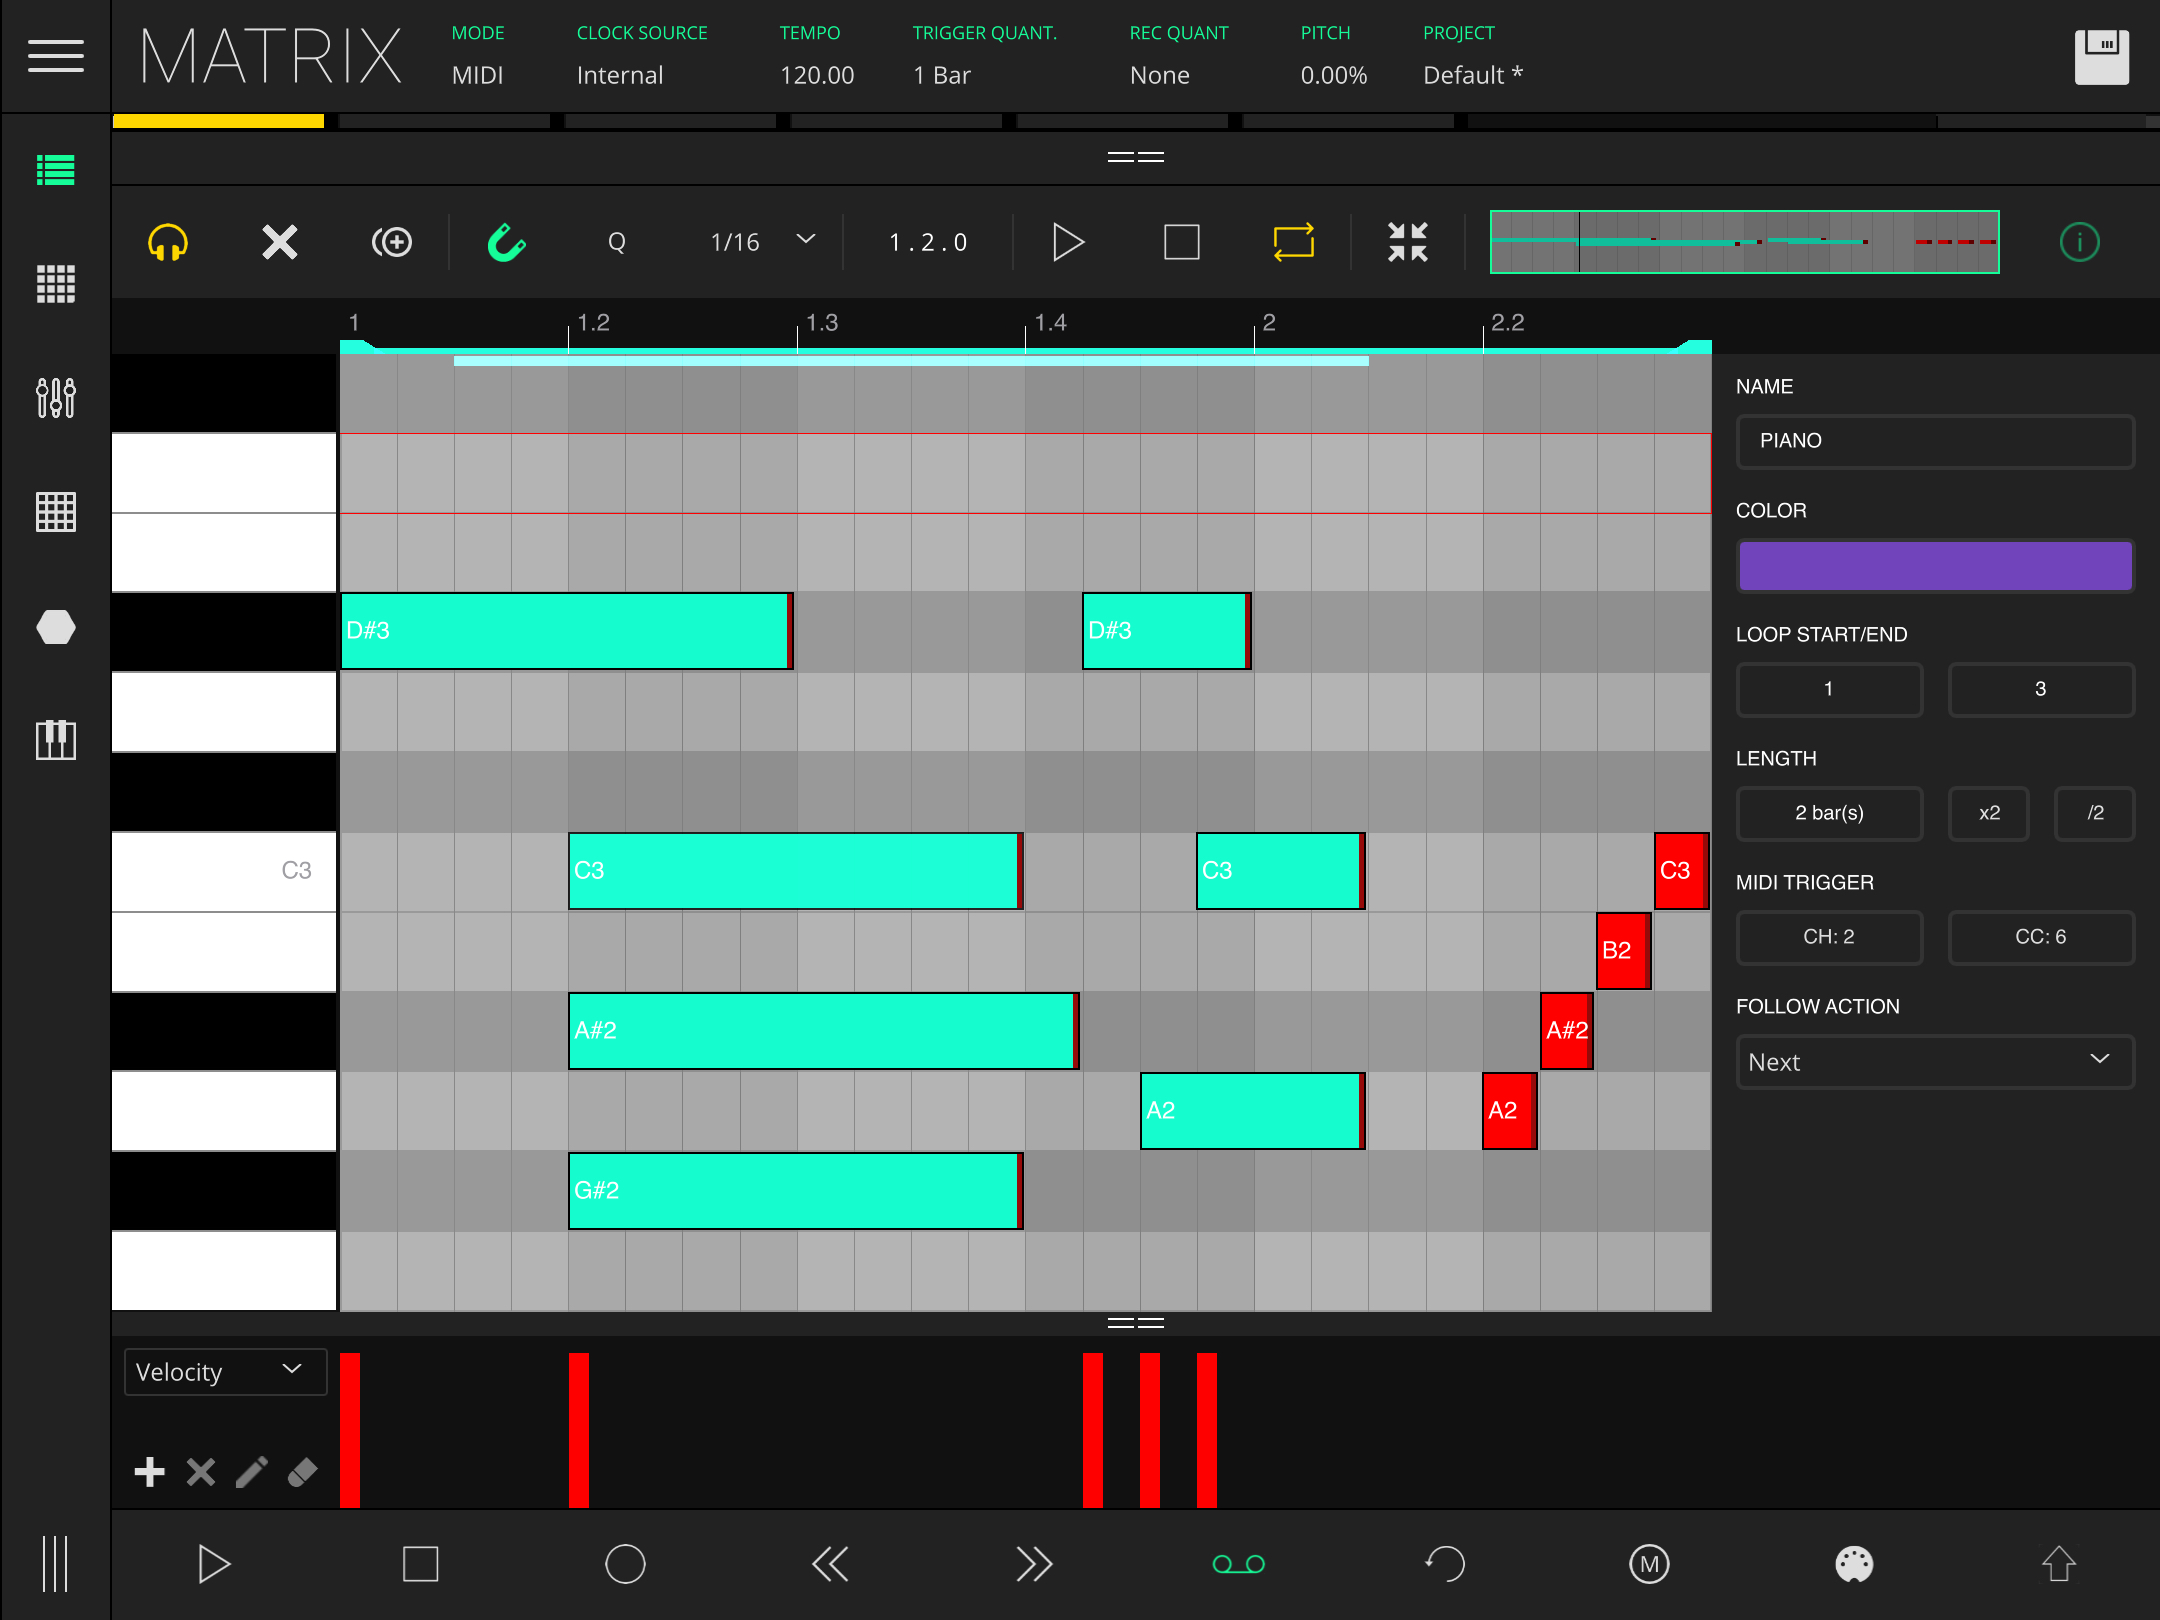
COMPOSER
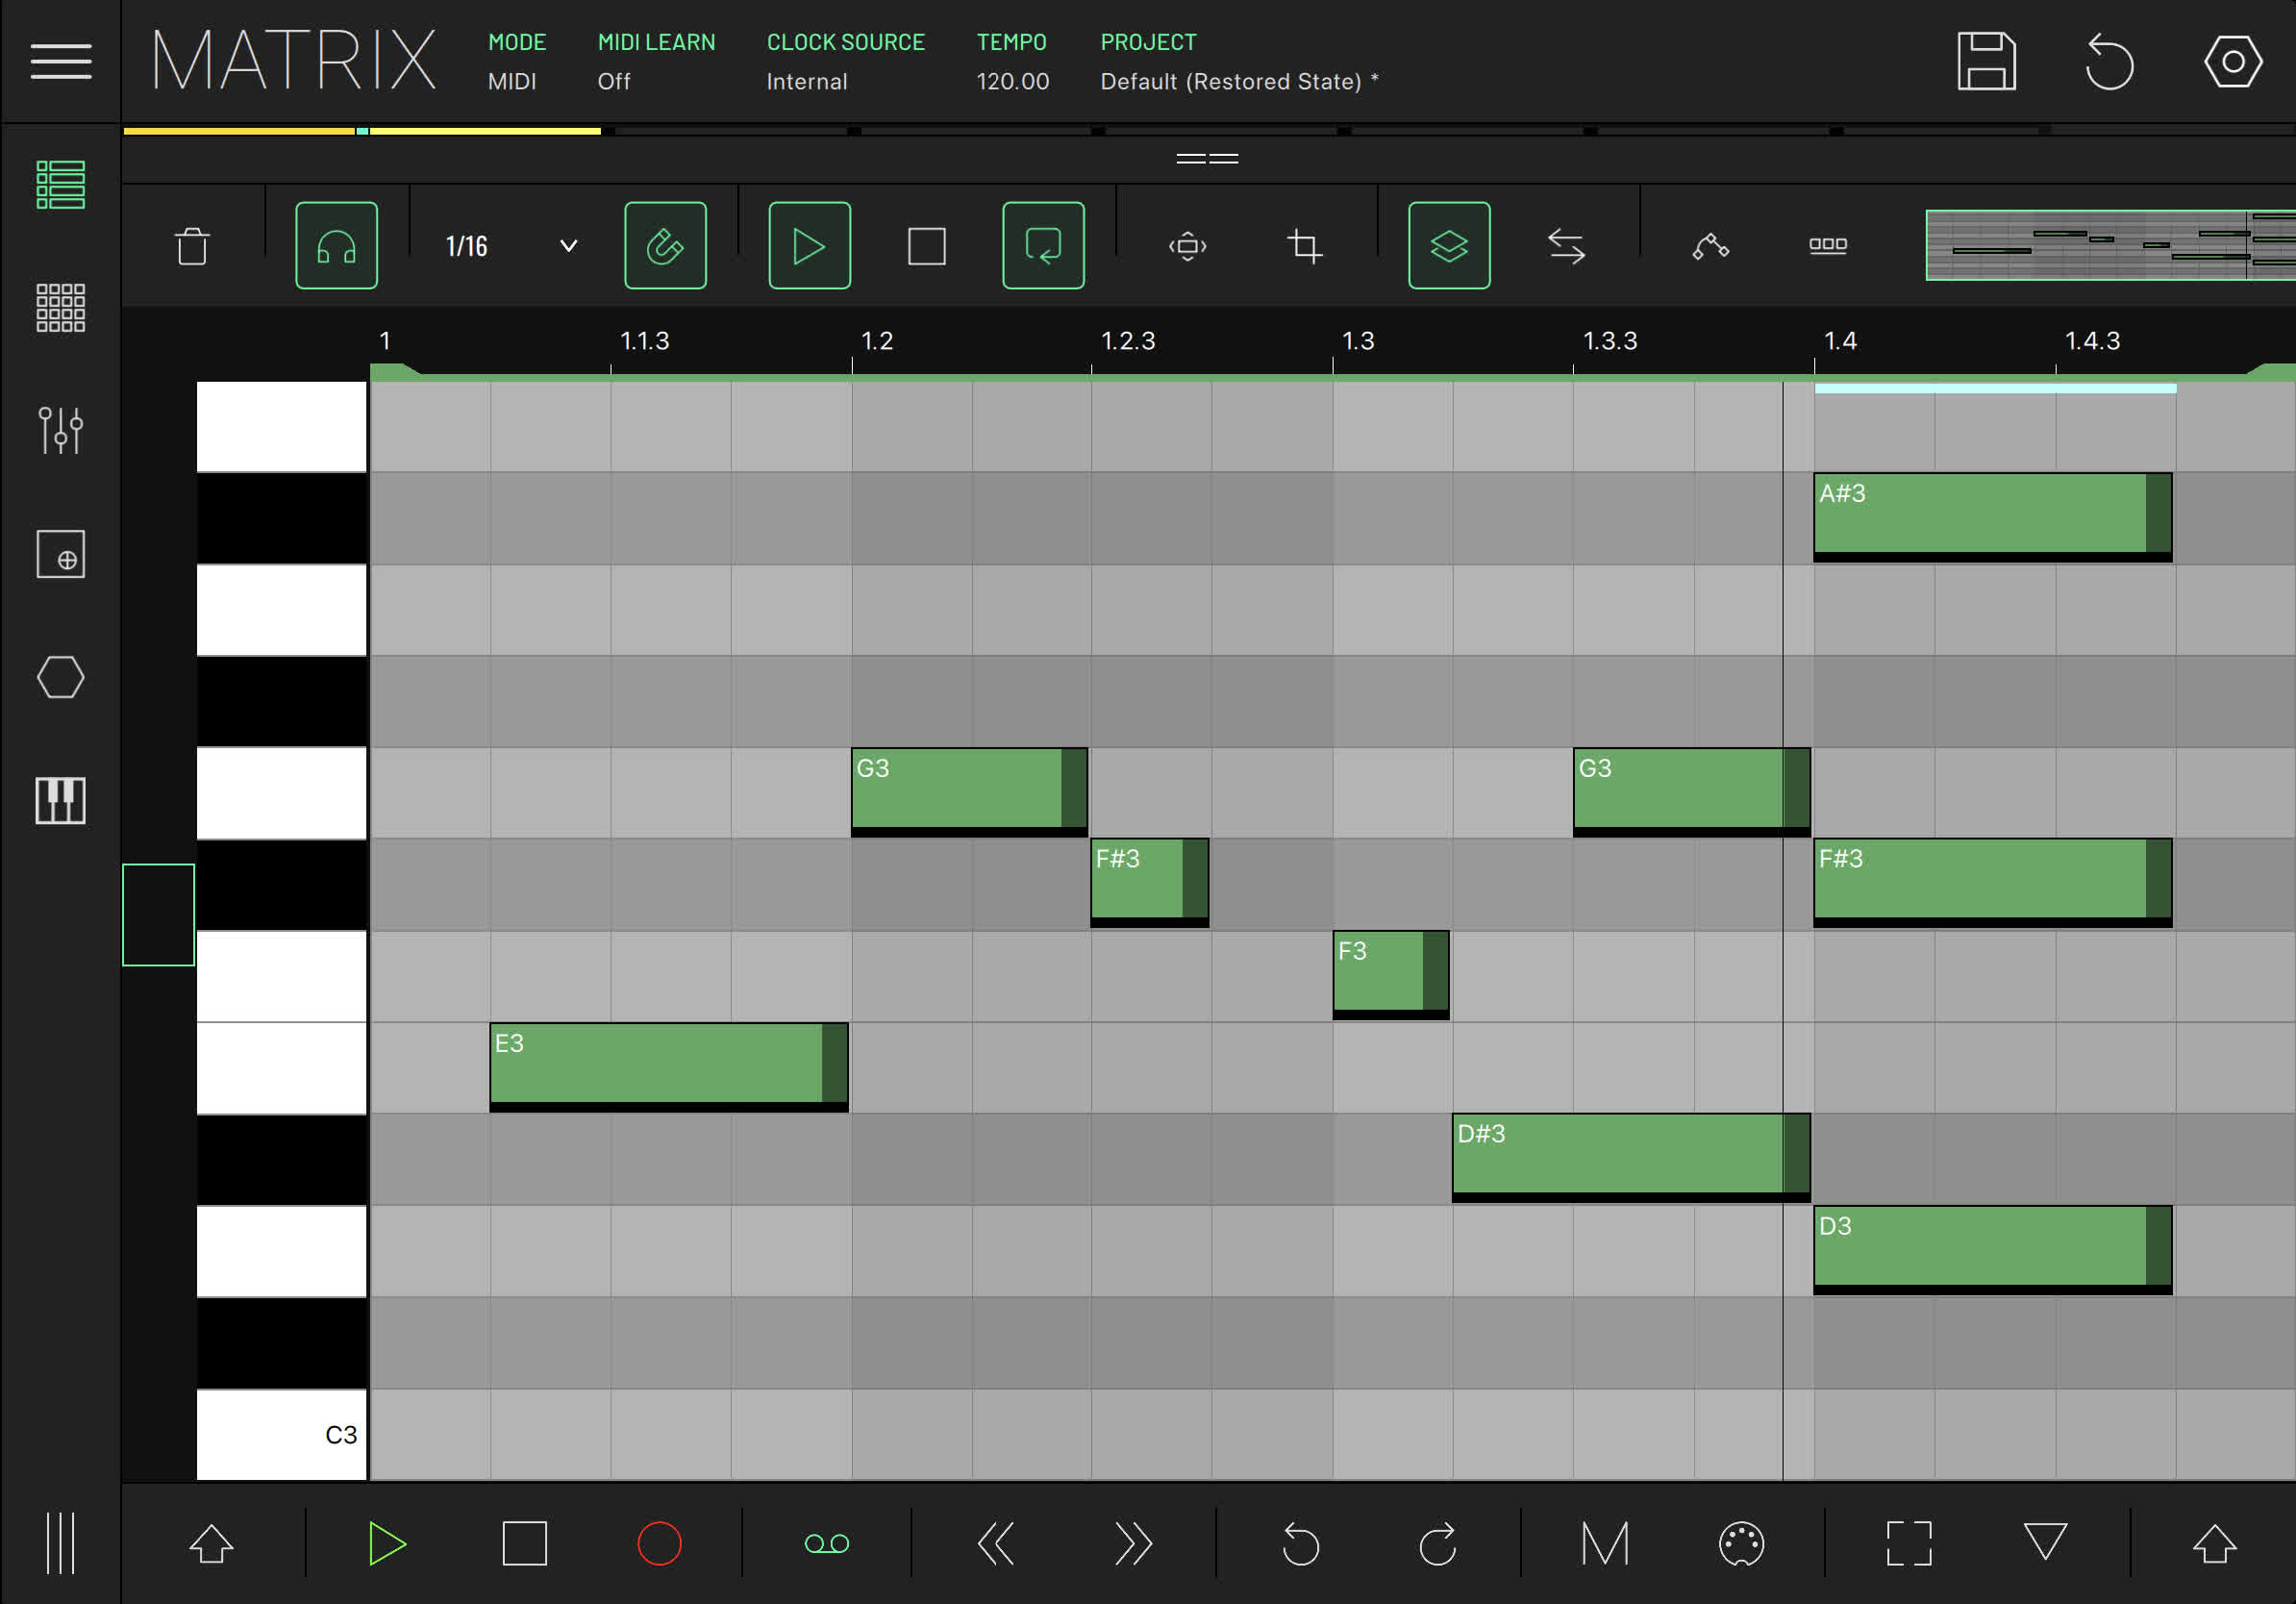
The Composer view displays a Piano Roll environment which allows you to edit the contents of the MIDI clips. Composer will always reflect the selected clip on the clip grid - except when selecting a return track or the master track, in which case you keep seeing the previous clip. The selected clip is the intersection between the selected track and select scene.
Piano Roll
The Piano roll is where you can view and edit the contents of the clip. All the basic actions, such as creating/deleting notes, zooming and moving notes, are available through gestures or by using a connected mouse.
Zooming and Panning
To zoom, pinch two fingers inwards (to zoom in) or outwards (to zoom out). To pan the clip area, drag two fingers in the direction you wish to pan. Pressing and dragging the keyboard scrolls up and down, and you can also use the scrollbar to the left of the piano roll to zoom (drag left and right).
Clip Loop Zone

At the top of the composer, aligning with the beat markers, is the loop marker, indicating the loop region. You can change its start and end by dragging the left or the right loop handles (the thicker edges on each side of the blue line). To move the loop region, drag the centre of the loop marker left or right.
Drawing notes
To draw notes, tap on the desired note location within the grid. Note length will be dependent on the grid snap resolution. If you press and slide to the right when adding a note, you can set a custom note size.
Selecting Notes
To select notes, simply press and drag inside the composer area. This will create a blue selection area, and all the notes inside that bounding box will be selected. When a group of notes is selected, the actions made to any selected note will affect all the other selected notes.
Deleting notes
To delete a single note simply tap it. To delete a group of notes just select the notes you want to delete, then tap any note from the selection to delete them all.
Changing note lengths
To change the size of a note, press and drag the right edge of the note (the end zone is marked with a darker color). When snap to grid is on, its length will be always snapped to the grid resolution. If a group of notes is selected, changing the length of one note will change the length of all selected notes by the same increment.
Moving notes
To move a note just drag the note to the desired location. The note will always snap to the grid resolution if the snap to grid option is active. To move a group of notes, make a selection, then drag any selected note to move them all simultaneously.
If a note is moved and dropped on top of an existing note, the existing note will be truncated where the note was dropped.
Toolbar
The composer features a toolbar on the top with the following functions:
- DELETE - Delete the currently selected clip. (If there is no clip, this icon changes to a plus sign which, when pressed, will create a blank clip).
- LISTEN - When enabled, pressing the piano roll plays notes.
- GRID RESOLUTION - Define the resolution of the grid.
- SNAP ON/OFF - Toggle grid snap, snapping notes to the grid divisions.
- CLIP PLAY - Trigger the clip for playback.
- CLIP STOP - Stop the clip.
- CLIP LOOPING - Toggle clip loop.
- ZOOM FIT - Automatically adjusts the viewport display to show all the notes in the clip. If the clip is empty, this button sets a predefined viewport.
- CROP TO SELECTION - Crops and resizes the clip to the current selection.
- SHOW BACKGROUND CLIP - Shows/hides the currently selected background clip.
- SWAP WITH BACKGROUND CLIP - Swaps this clip with the background clip. (This clip becomes the new background clip.)
- AUTOMATIONS - Show the Automations panel.
- TOOLS - Open the Clip Tools panel.
- VIEWPORT NAVIGATOR - Miniature display of the clip. Drag left and right to scroll horizontally, and vertically to zoom in and out.
Clip Tools
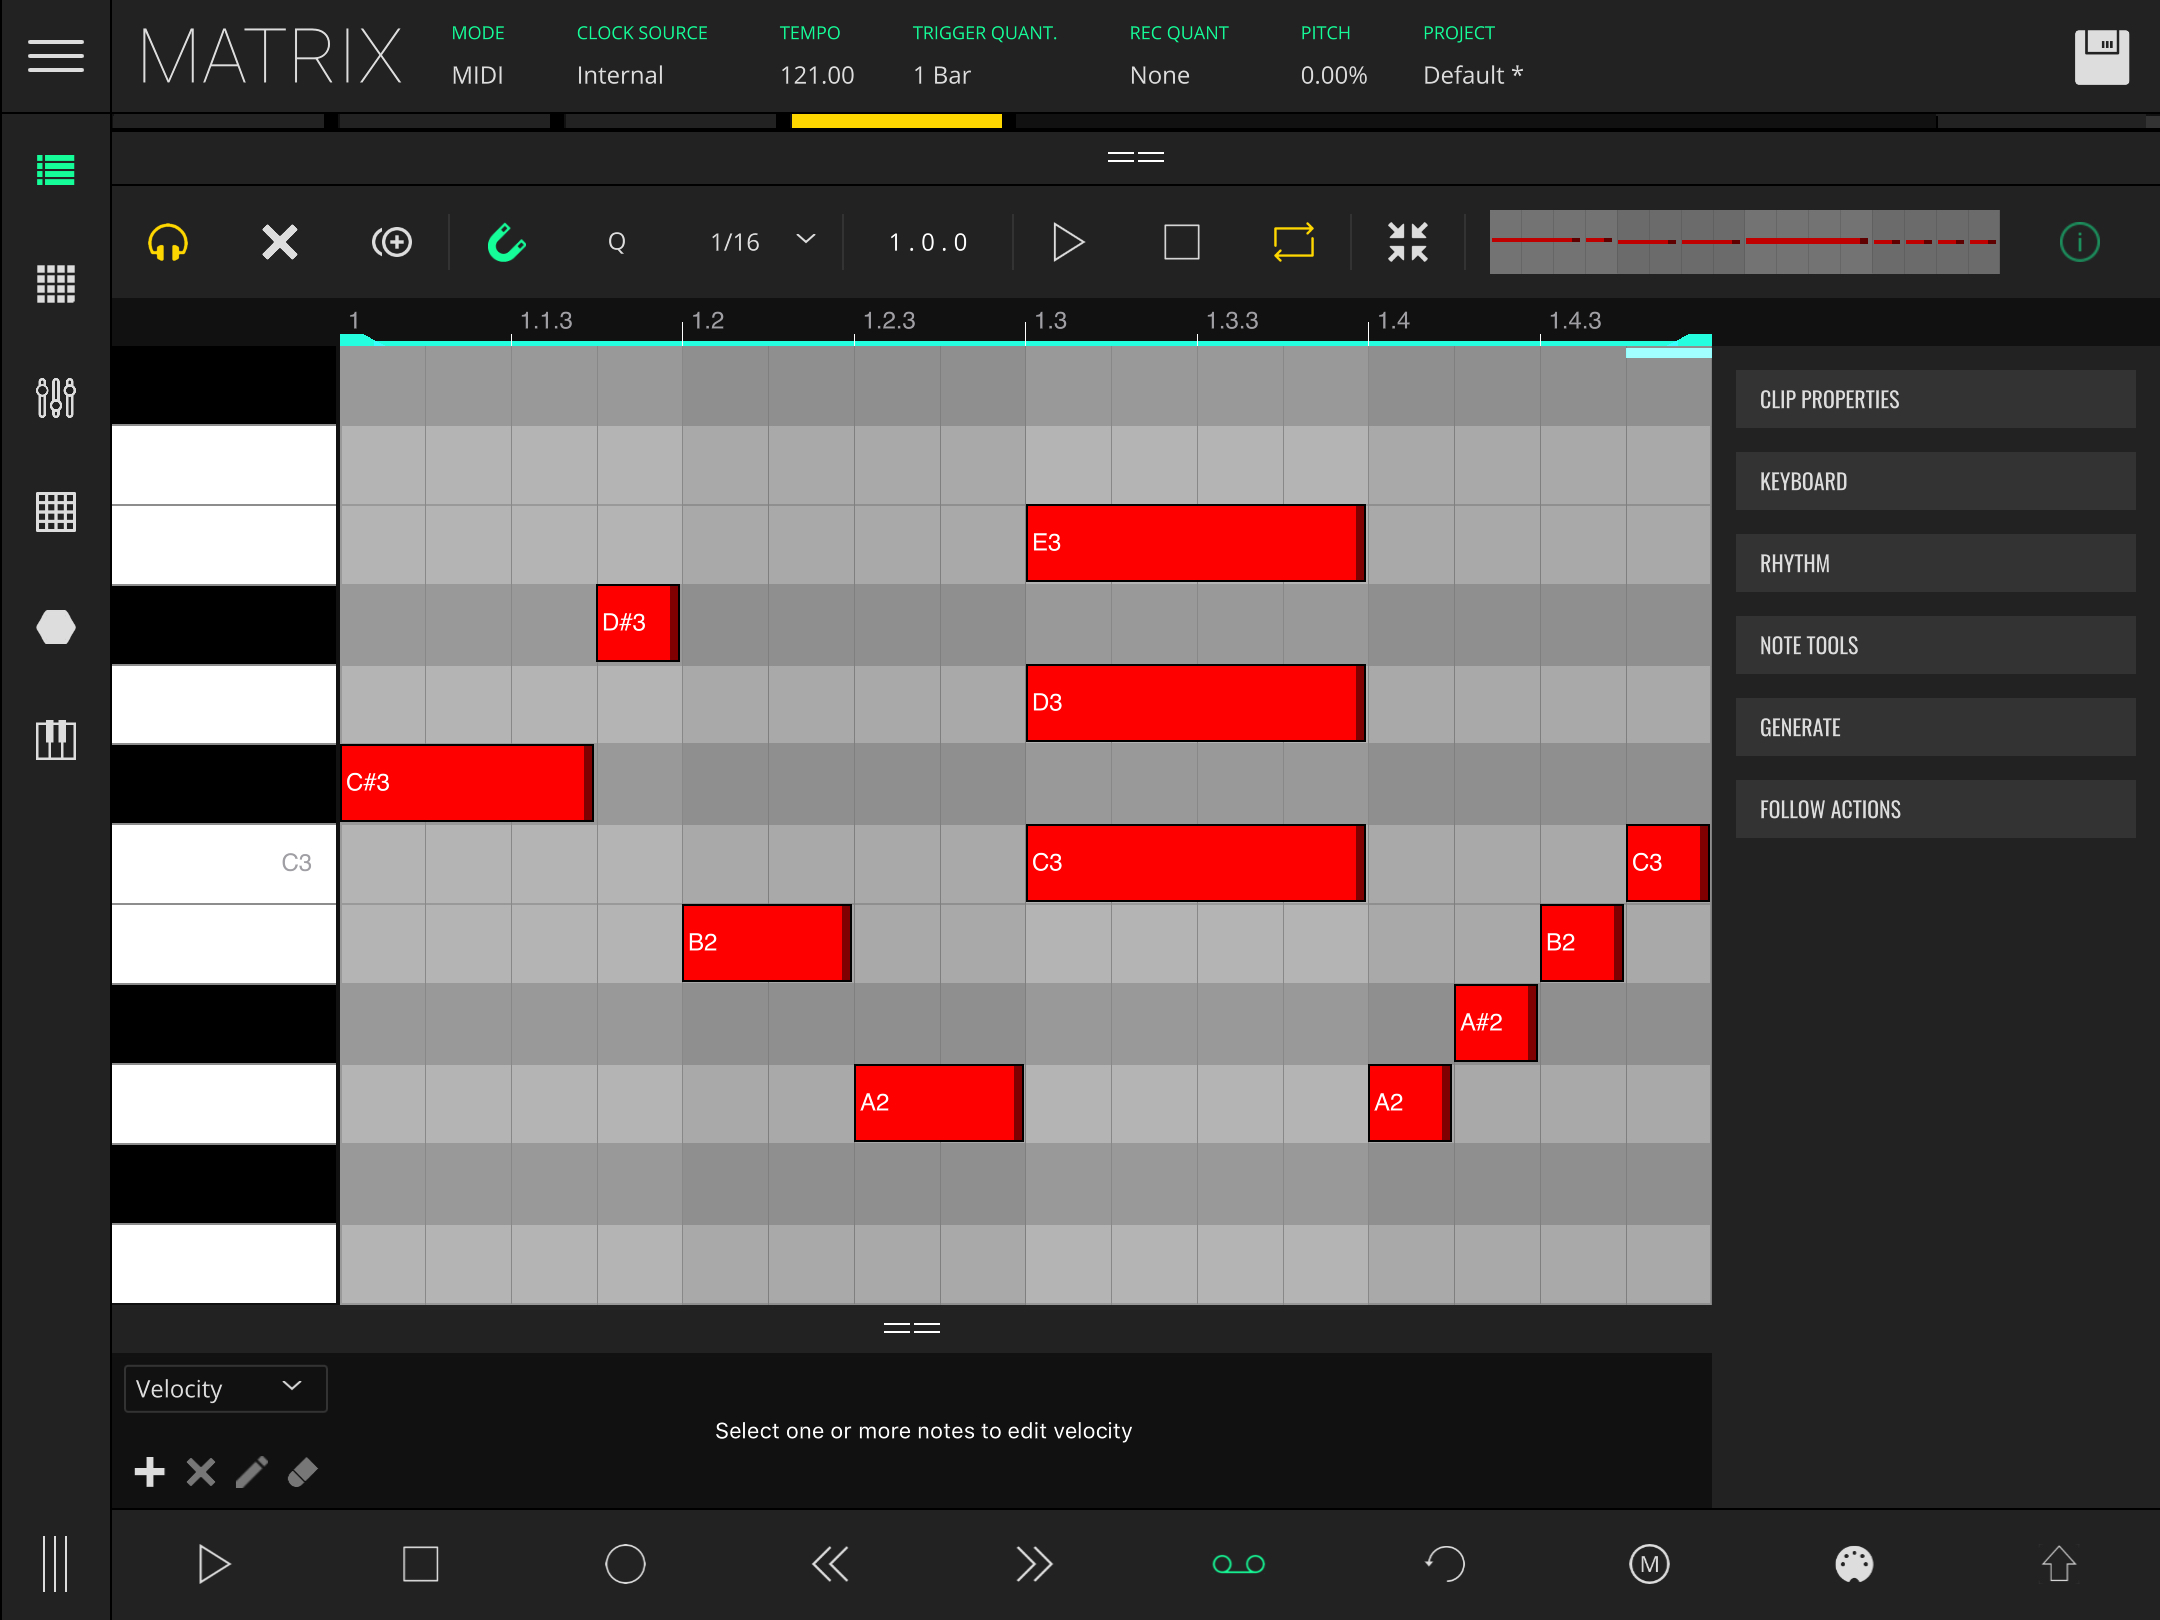
Located on the right, this menu consists of several panels which can be selected by tapping each respective icon. Here you can access the clip's properties plus a range of creative tools to help generate and edit MIDI notes in a variety of useful and interesting ways.
Clip Properties
Here you can access the clip's general properties.
- NAME (MIDI MODE) - Edit the clip’s name.
- SIGNATURE - Edit the clip's time signature.
- LOOP START/END - Select the start and the end of the loop.
- LENGTH - Set the clip length using 1 bar increments.
- X2 - Double the clip’s length, duplicating the current clip content.
- /2 - Halve the clip’s length, truncating the current clip content.
- PLAY MODE (MIDI MODE)
- FROM START - Playback starts from the loop start.
- CONTINUE - Playback resumes from the latest point.
- COLOR (MIDI MODE) - Change the clip’s background color.
Keyboard
This provides the option to set a scale for the current clip and mark all piano roll keys for that scale with a red square. This serves as a visual aid to help you stay in key when composing.
- PRESET - Select from a variety of presets that fold the keyboard to fit different apps. Useful for playing other music applications using LK.
- SCALE - Select from a variety of scales.
- ROOT KEY
- LAYOUT - Set a custom scale.
- FOLD - Fold the keyboard in several ways for convenience.
- NOTES - Show currently used notes.
- SCALE - Show notes belonging to the selected scale.
- NOTES TO SCALE - Similar to Notes, but displaying them across all octaves.
Rhythm
Allows making subtle timing adjustments to the notes.
- SWING - Add swing to your rhythm. This gives your groove a more "jazzy" feel by lenghtening the notes on the downbeat and shortening the others. You can change the amount of swing to apply, and your desired swing division.
- HUMANIZE - Add a slight random variation to the note timings to give your composition a more "human" feel. Like swing, you can change the amount being applied and also its division.
Note Tools
LK provides a range of custom note actions from basic time-saving tools to musical operations, allowing you to make creative changes to your created lines.
Note: If no "all" command is available for a certain operation, the operation applies to selected notes. If no notes are selected, it applies to all notes.
- ACTIONS
- SELECT ALL - Select all notes of the clip.
- DESELECT ALL - Deselect all notes.
- DELETE ALL - Delete all notes.
- DELETE SELECTED - Delete selected notes.
- DUPLICATE - Duplicate notes.
- QUANTIZE - Snap the notes to the grid.
- MIRROR - Mirrors the note positions horizontally or vertically.
- TIME SHIFT - Shift the notes left or right according to the composer grid division. Notes shifted outside the clip wrap around.
- PITCH SWAP - Swap each note's pitch with the adjacent one.
- TRANSPOSE - Transpose notes by the selected semitones.
Generate
Here you can generate or change notes in a musical manner. This action will take the clip's scale into account. If you want some friendly results, please select a scale (or make a custom one) so that the generated notes remain in tune with your song.
- CHORDS - Generate random chords.
- MELODY - Generate random note sequences.
- RANGE - Define the minimum and maximum pitches for the generated/mutated notes.
- MUTATION - Changes your composition slightly in two ways:
- Chords - Generate chords with your written melody serving as root notes.
- Melody - Slightly change the pitches of your current melody maintaining the note timings.
Follow Actions
Here you can choose what will happen to the clip/notes when the current clip reaches its end.
- FOLLOW ACTIONS - Select action to perform when the designated loop count is fulfilled.
- LOOPS/PROBABILITY - Number of loops before the follow action is performed. Probability determines the chance of the follow action to apply. If it does not, another attempt will be made after the number of loops is fulfilled.
- TRANSFORM ACTION - Select transform action to perform when the designated loop count is fulfilled.
- LOOPS/PROBABILITY - Number of loops before the transform action is performed, and its probability.
Velocity, Probability and Automations
When the Automations icon ![]() is toggled, an editor is overlaid on top of the composer, letting you change notes' velocities and probabilities, and create MIDI automation lanes.
is toggled, an editor is overlaid on top of the composer, letting you change notes' velocities and probabilities, and create MIDI automation lanes.
In LIVE MODE, only velocity editing is available.

Velocity and Probability
When the automations editor is enabled, a bottom bar is displayed. VELOCITY is selected at first, displaying note velocities.
The note velocities are represented by red rectangles. Velocities are displayed only for the selected notes. You can select all notes in a key by double pressing it in the keyboard. A note's velocity is also reflected in the note's drawn color.
You can change the velocity of the notes by pressing and dragging the velocity bars. If shift is pressed, the velocity change will apply to all selected notes and will be relative to their current values, rather than absolute.
To edit note probabilities, select PROBABILITY in the bottom bar. Note probabilities work similarly to velocities; they're represented by red rectangles and can be edited by pressing and dragging. A note's probability is reflected in the black rectangle drawn in the bottom of the note.
Automations
To create an automation lane, press the "plus" icon in the bottom bar. The following dialog will pop up:
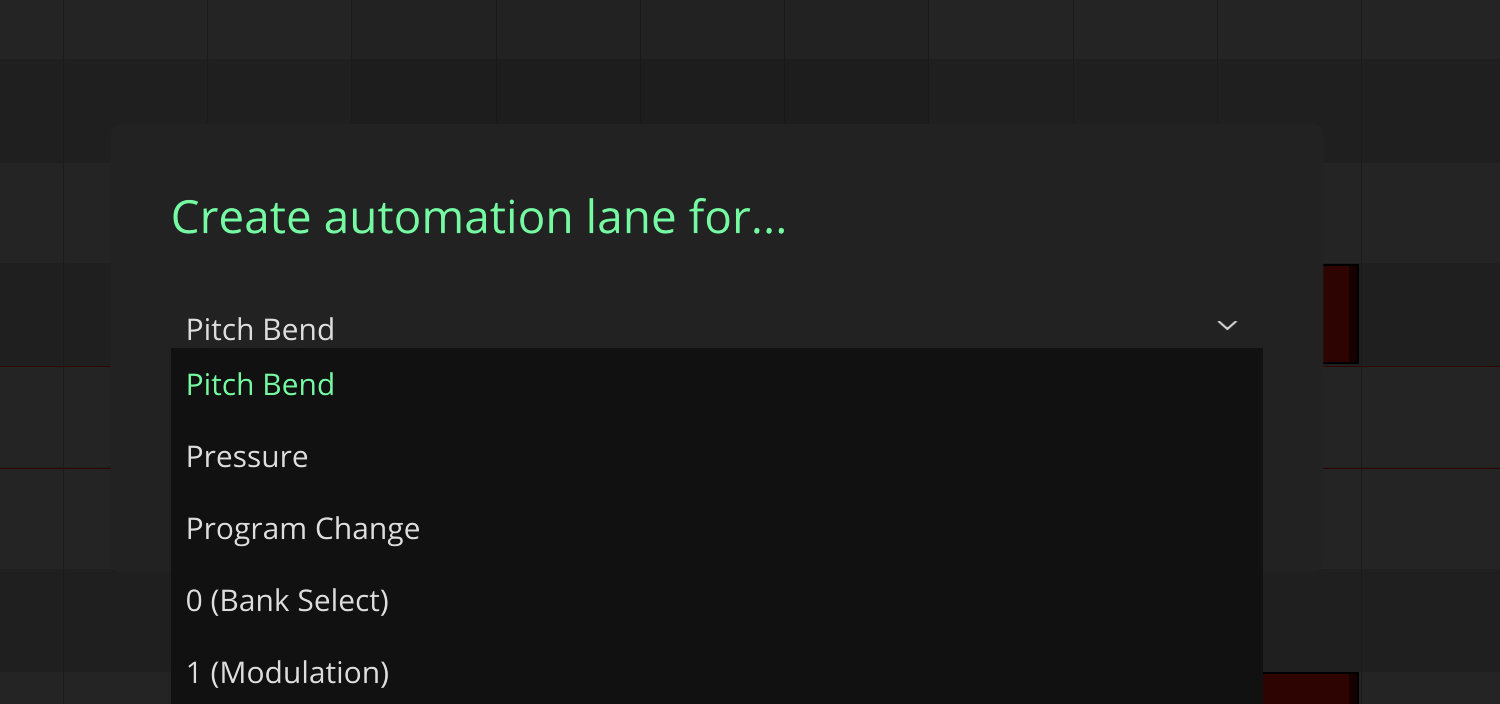
You can select which MIDI CC to automate. Additionally, you can send pitch bend, pressure and program change messages.
Once a new lane is added, you can perform the following actions:
- CREATE - Tap any empty space in the automations zone to create a node.
- DELETE - Tap any existing node to delete it.
- DRAG - Drag a node to change its value (vertical) and position (horizontal/time). Drag a line to change the vertical value of the connecting nodes at the same time. When shift is pressed, dragging vertically changes the curve between the two nodes.
The bottom bar has the following controls on the left side:
- AUTOMATION SELECTION
- PLUS - Add a new automation lane.
- PENCIL - Rename the automation lane.
- DELETE - Delete the automation lane.
On the right side:
- PENCIL - Enable draw mode. Pressing and dragging creates nodes with their positions snapped to the current grid division.
- ERASER - Enable eraser. Pressing and dragging deletes nodes.
- COPY - Copy this automation lane for pasting in other clips.
- PASTE - Paste automation lane.
Devices
The Devices tab lets you browse and tweak the selected Ableton Live track devices. Start by selecting a track with devices (if there are no devices available on the track, the tab will display a message). ALl devices appear collapsed by default.
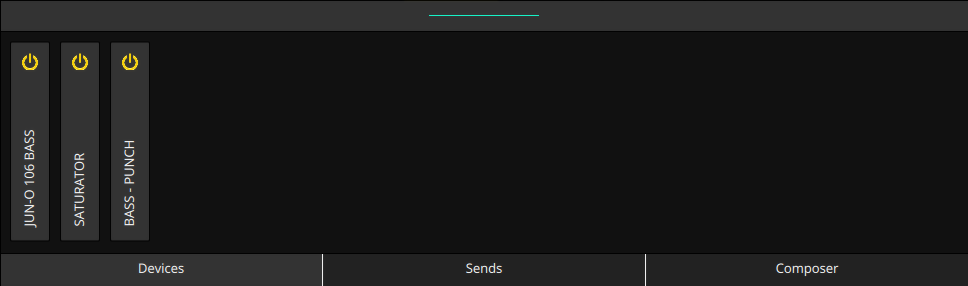
When open, the first device will fill the whole tab, while the next devices will break to the next line. Drag up to scroll down and view the other devices.
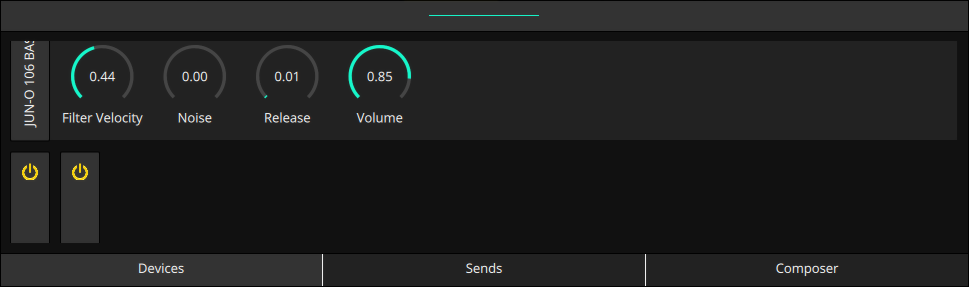
Each device container is scrollable, allowing horizontal navigation of all parameters and subdevices. If the device has only a small set of parameters then the rest of the tab will show empty space, except when the device has a device chain (i.e. a Drum Rack or Instrument Rack).
Note: The option to ‘include chain’ must be enabled in LK settings. Let’s look at this example:
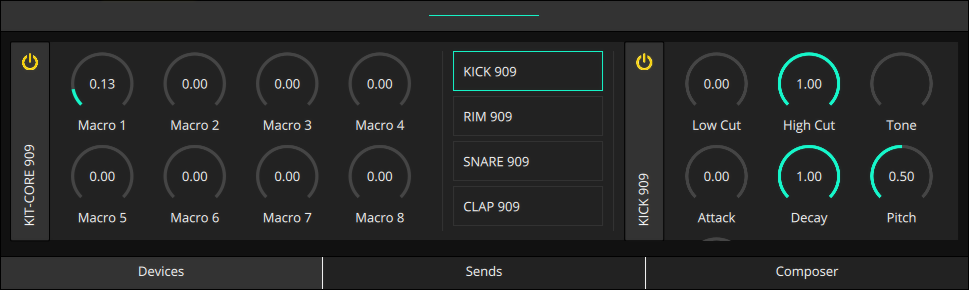
A 909 Core Kit has a device chain for each drumpad. The first parameters correspond to the chain instrument's parameters, followed by the list of devices in the chain.
When you select a different device in the chain, the selected device will be loaded to its right. Drag left to display the device's parameter. Note: In rare occasions, a long device chain may strain your mobile device's resources and force LK to shut down.
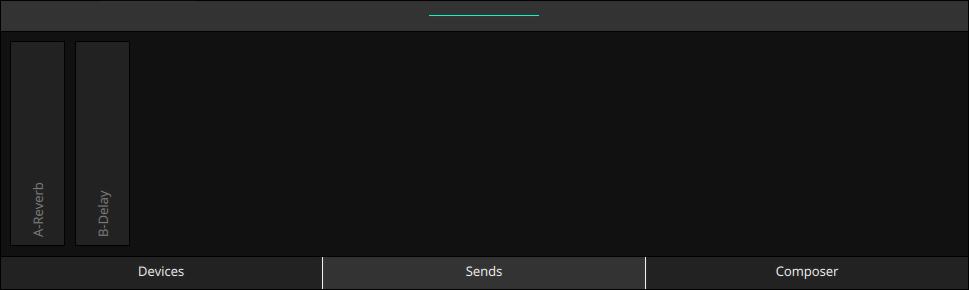
Sends
The Sends tab lists the selected track sends. To change the send value, touch the slider and drag vertically.